Step by Step Guide to Building Shandaken's Signature Studios
Use of this guide is subject to the terms described in its final paragraph.

This studio building is meant to be a flexible space that accommodates a range of practices, is cheap to build, and is possible to erect anywhere. It can also be dislodged from its "foundation" and moved if necessary. The exact budget is difficult to determine, as we built three studios at once with varying designs and a few discounts and coupons. However, the materials needed to build one can be reasonably estimated at a little over $1,700.
Given that lumber is the biggest cost, remember to combine and parse the cut list into longer lengths of wood, maximizing the amount of usable wood cut from standard board lengths. Note that the given cost of materials does not include tools or shipping.
Our basic tool chest included one of each of the following per person: battery screw gun, extra phillips and square bits, measuring tape, level, line level, framers square, quick square, pencils, permanent markers, apron, gloves, and a ladder at least 8' tall (or larger, preferably). We also had at least four vice grips (preferably more), a handsaw, a pry bar, hammers, a chisel, an angle finder, chalk line, a set of ratchet straps, tin snips to cut our PVC, and some drop cloths to keep things dry. Bear in mind that transportation of materials can be difficult and will require a way to hold many sheets of 8' x 4' material at a time, which not all trunks are built for. Like our budget, the fastener needs are difficult to nail down (har har) exactly, because we bought in bulk for a couple of different designs. We estimate that for a single studio we used about:
- 6 lbs of 3" exterior screws
- 3 lbs of 2 1/2" exterior screws
- 3 lbs of 1 1/4" screws
- 1-2 bags of 80 hex-washer-head drill-point roofing screws
- Some fat 1 1/2" screws to secure the hinges on the barn doors
- 1 lb of 3" galvanized nails to bolster the screws in the floor frames.
IMPORTANT NOTE!!!: If you can afford it, we STRONGLY recommend getting square heads for your 3" screws. It will make your life SO much easier. Of course cutting down your lumber and sheets of OSB will require a chop saw, safety gear, some saw horses, and a rotary saw (we used hand-held but table would be easier) in addition to the above.
Step 1: Dig and Place the "Foundation"
- At least 12 cement blocks
- 4-5 80 lb bags of cement
- Water to mix cement
- 6 anchor bolts
- Shovels
- Masonry trowels
- Cement mixing bin
- Wooden stakes
- Mason line
- A board to check for level
- Tamping tool like a heavy board
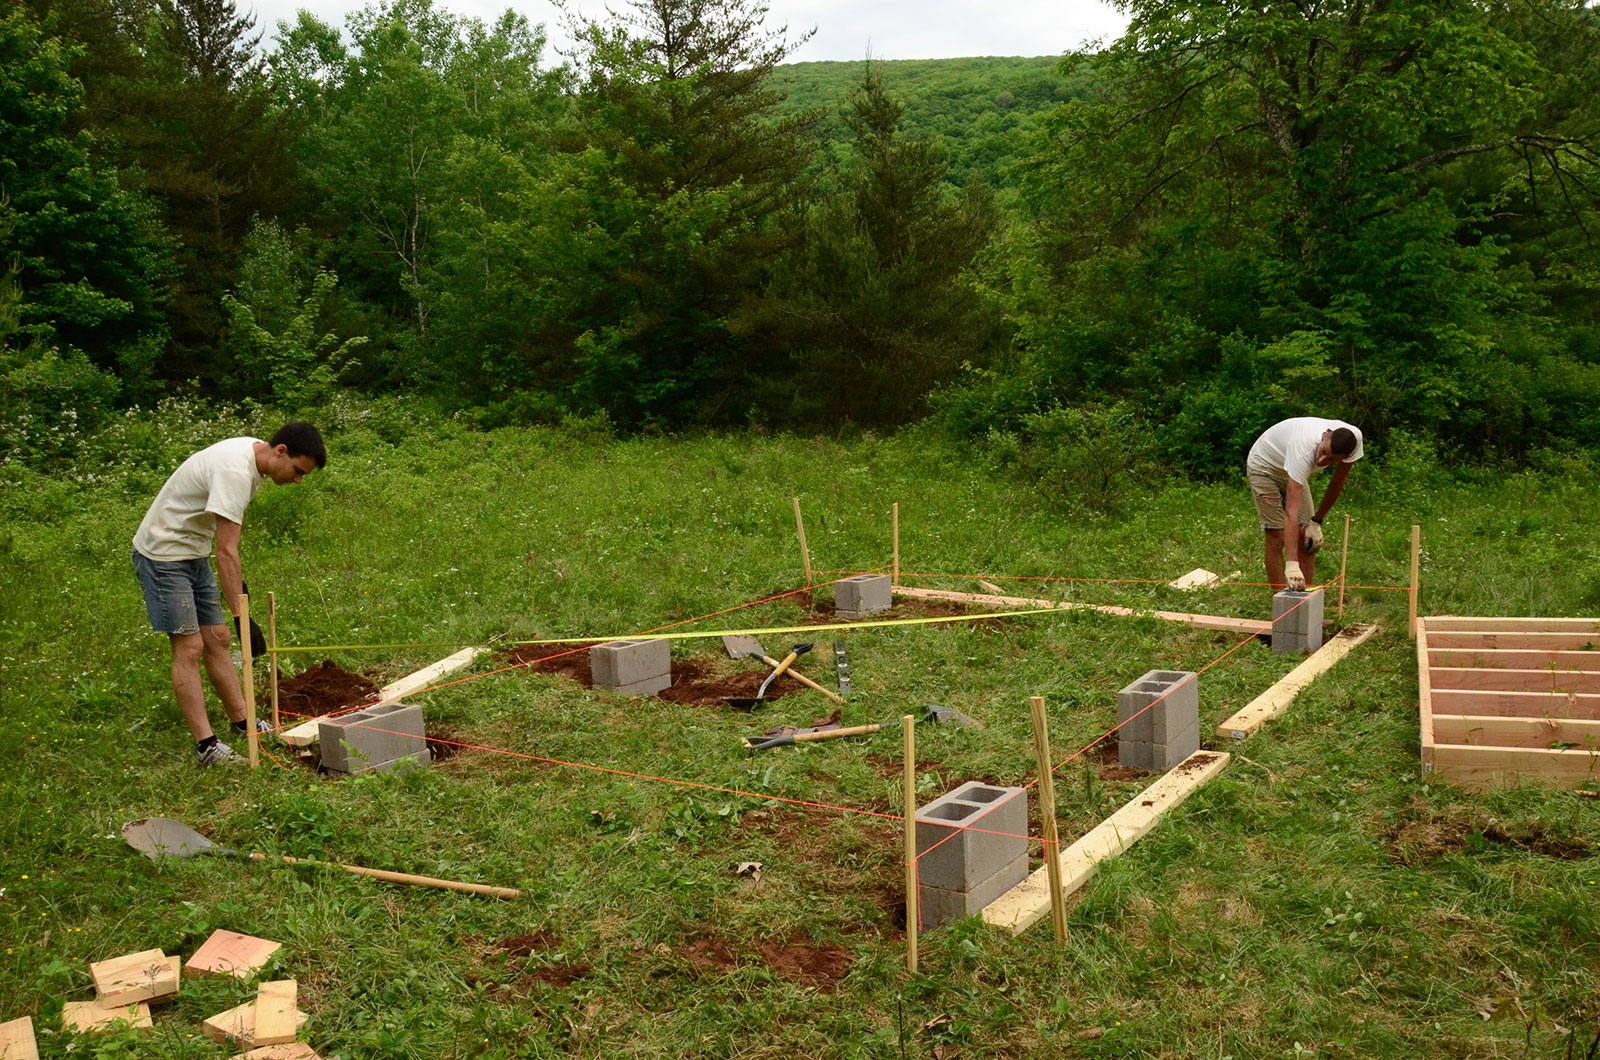
We chose to set the studios on cement blocks for permitting reasons, and in case they ever have to be moved. First, you must dig holes so that your blocks sit below the frost line. Ours are about 12 inches below the ground. They MUST be TOTALLY level at the bottom. Place the cement blocks in the holes so that they will sit perfectly flush underneath the four corners of your 10' x 14' frame and provide support for the joint between the two sections of the floor frame (see below). Stack enough blocks so that your studio will not be sitting directly on the ground. For us, this meant two per hole.

You can use mason line to mark where the frame will eventually go.
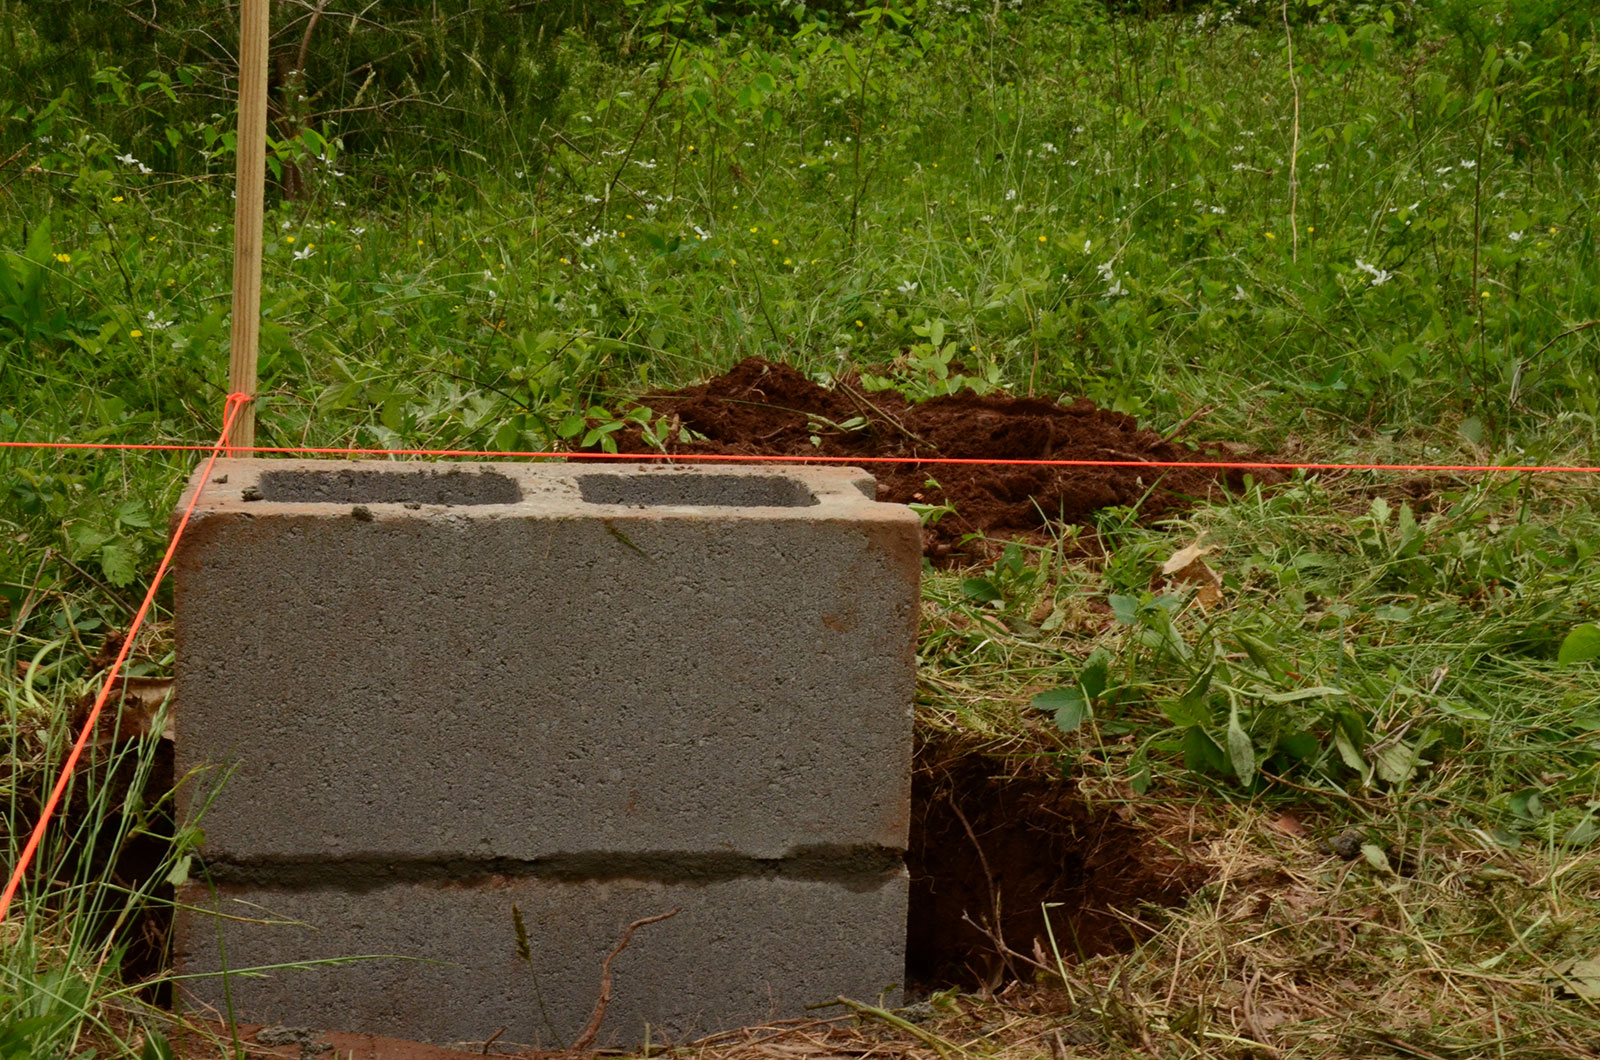
To make sure that the cement blocks provide a flush foundation, measure end to end and also diagonally to check for square. Make sure you check the level.
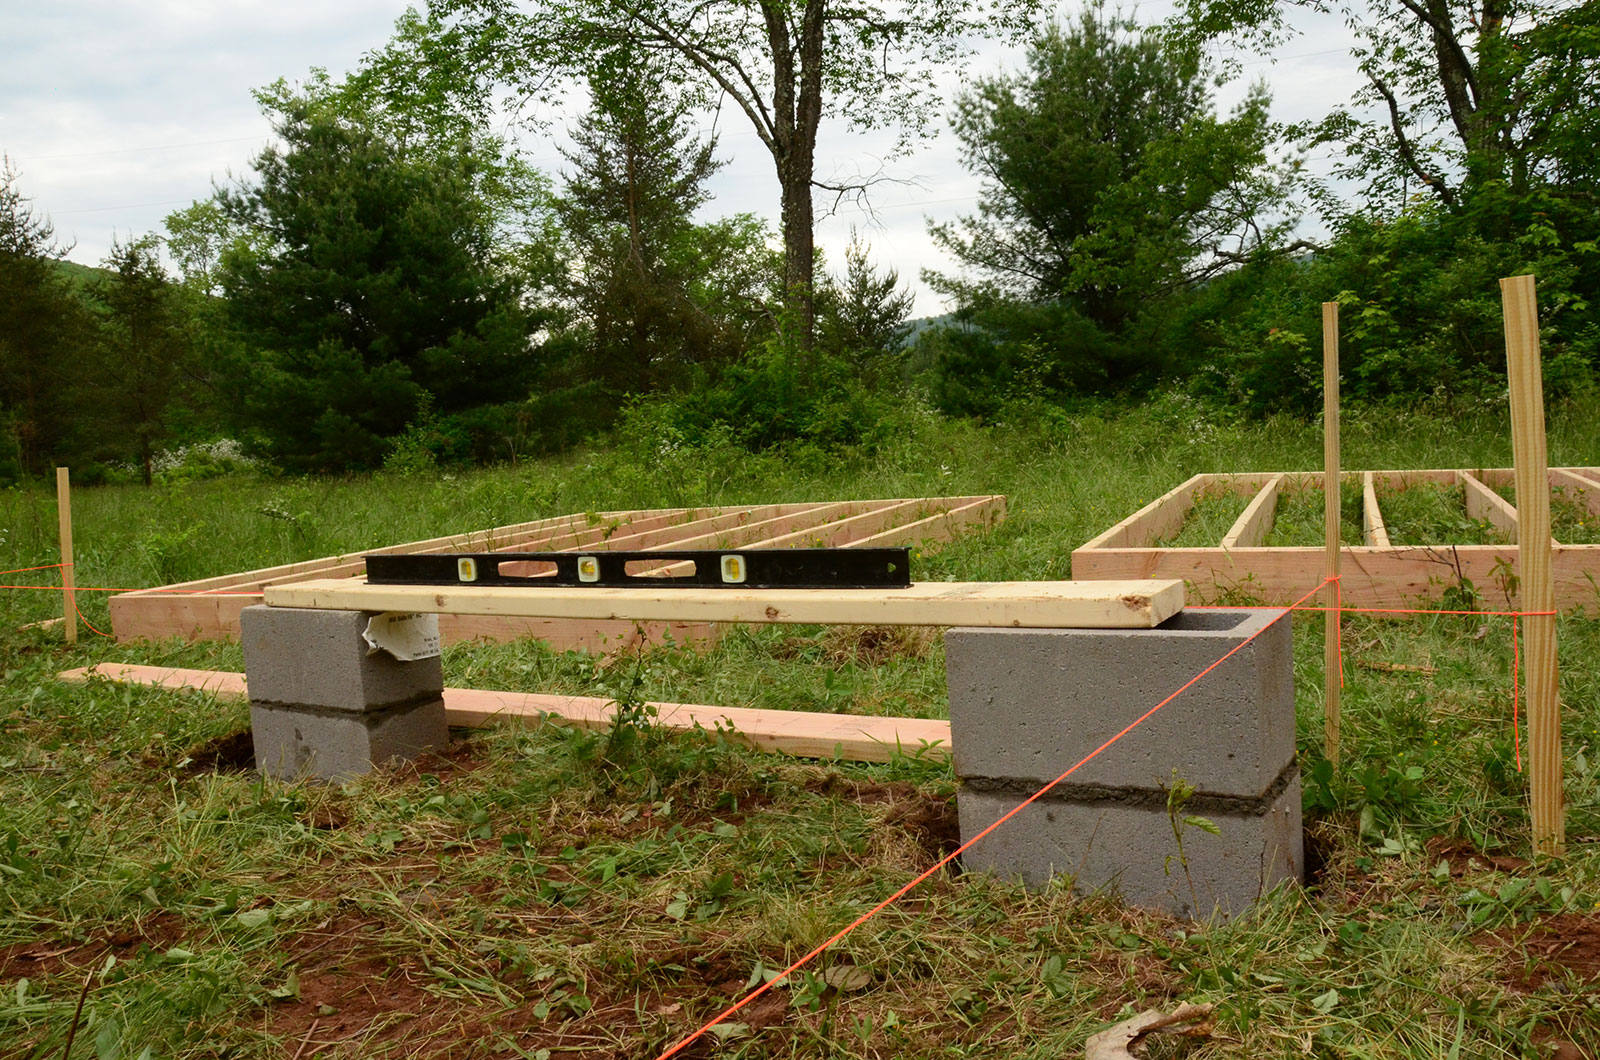
Mix the concrete to pour into and around the cement blocks to keep them in place. Before you pour, place an anchor bolt into one of the holes in each of the blocks, which will anchor the frame to the foundation. Pour the concrete into the holes of the cement blocks. Pour extra concrete around the blocks to help keep them in place.
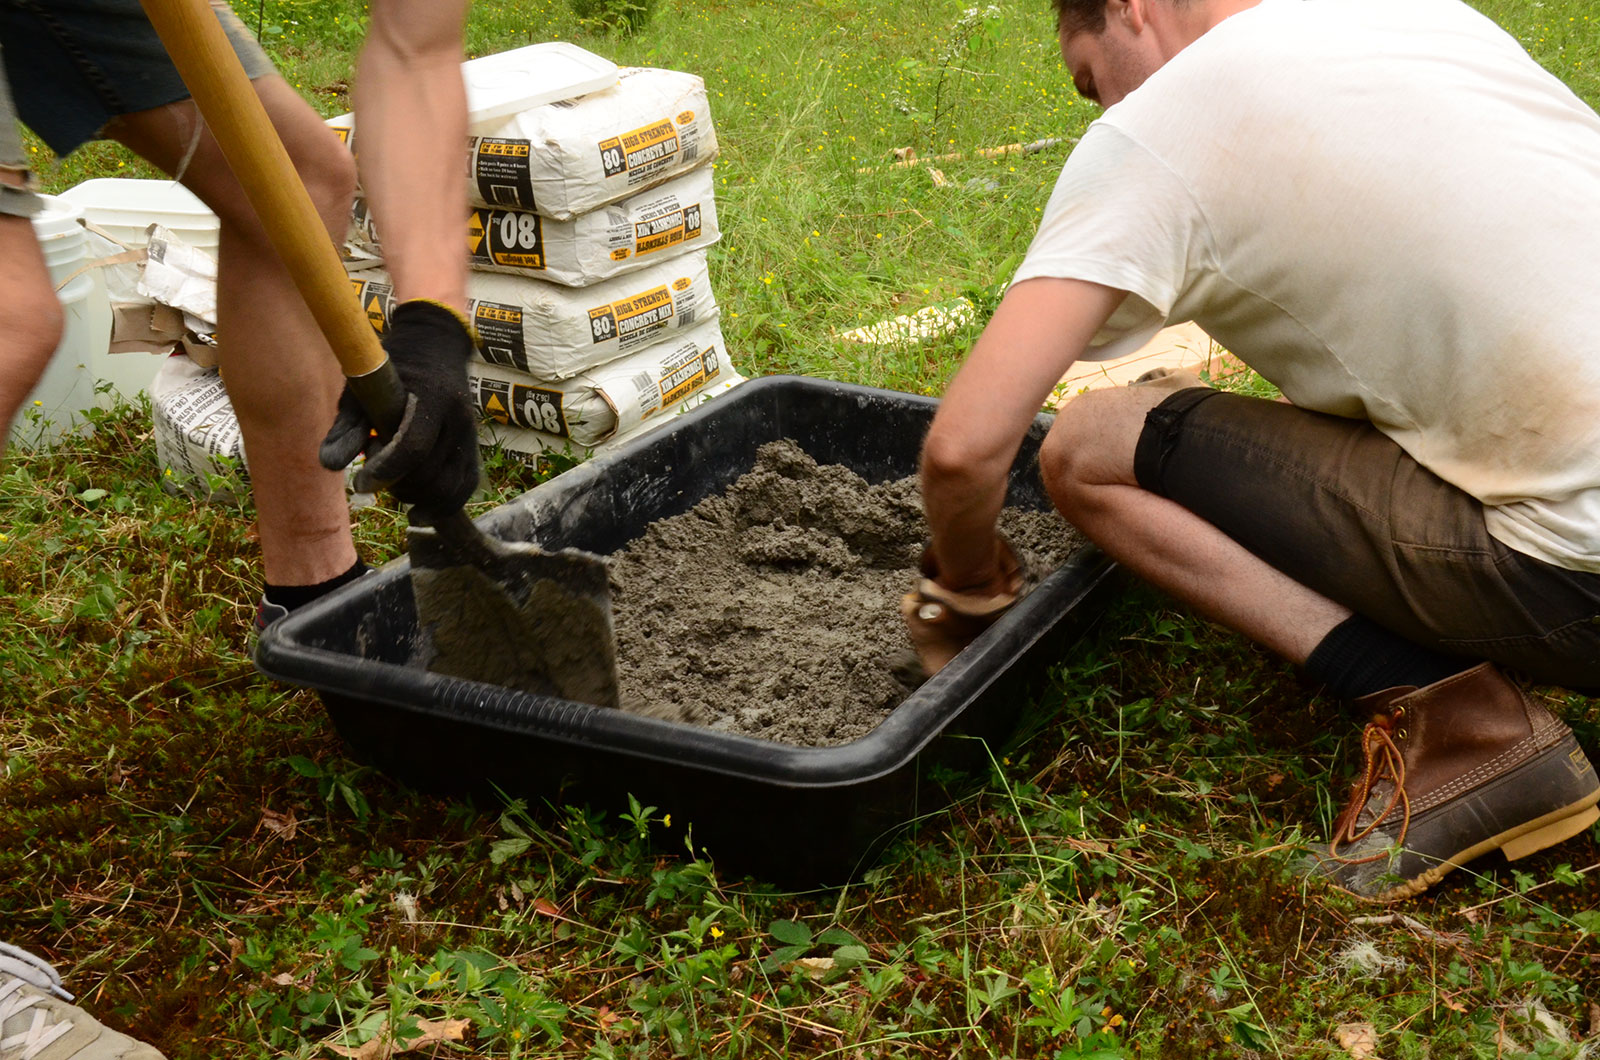
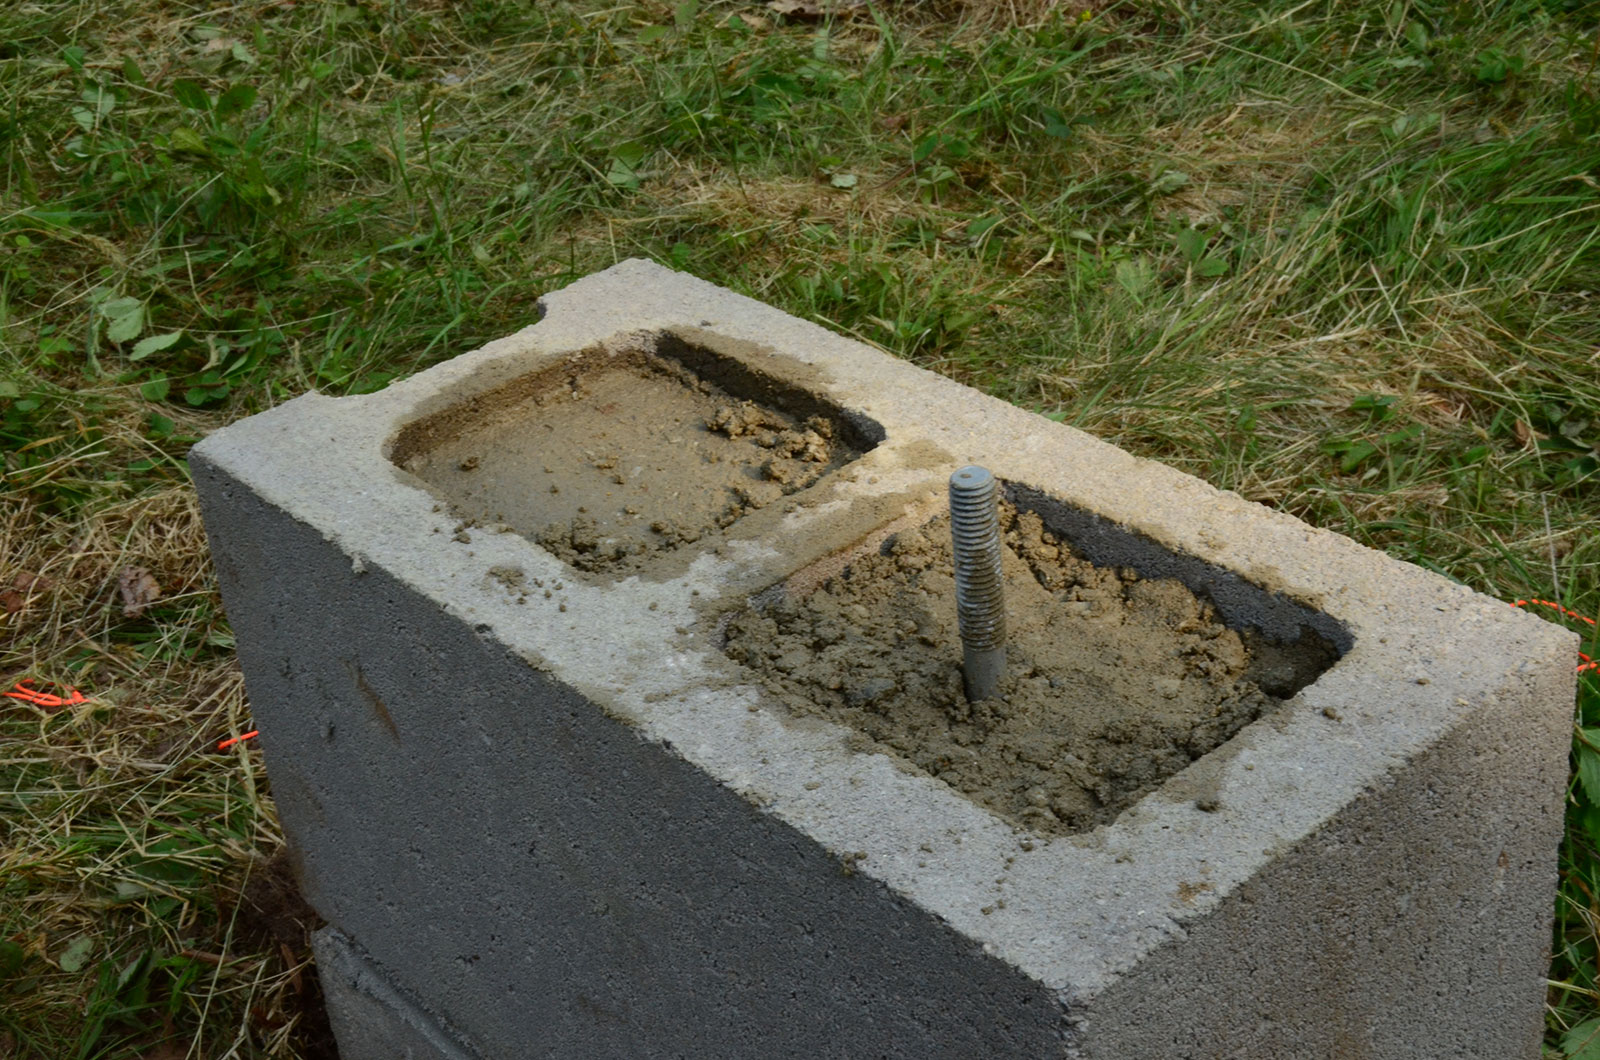
Wait at least 24 hours or follow directions on the package for the concrete to set up. Replace the soil around the blocks and tamp it down firmly.
Step 2: Floor Frame and Installing the Floor
- (8) 2 x 10 x 72"
- (8) 2 x 10 x 96"
- (15) 2 x 10 x 109.5"
- (9) 2 x 10 x 15 1/4"
- (1) 2 x 10 x 10.75"
- (1) 2 x 10 x 2.75"
- (2) 2 x 6 x 72"
- (2) 2 x 6 x 96"
- 6 nuts and washers to match the anchor bolts from the previous step
- At least 2 carriage bolts and 2 accompanying nuts and washers
- 6 sheets 3/4", 4' x 8' tongue-and-groove OSB
- Drill bit to fit your anchor and carriage bots
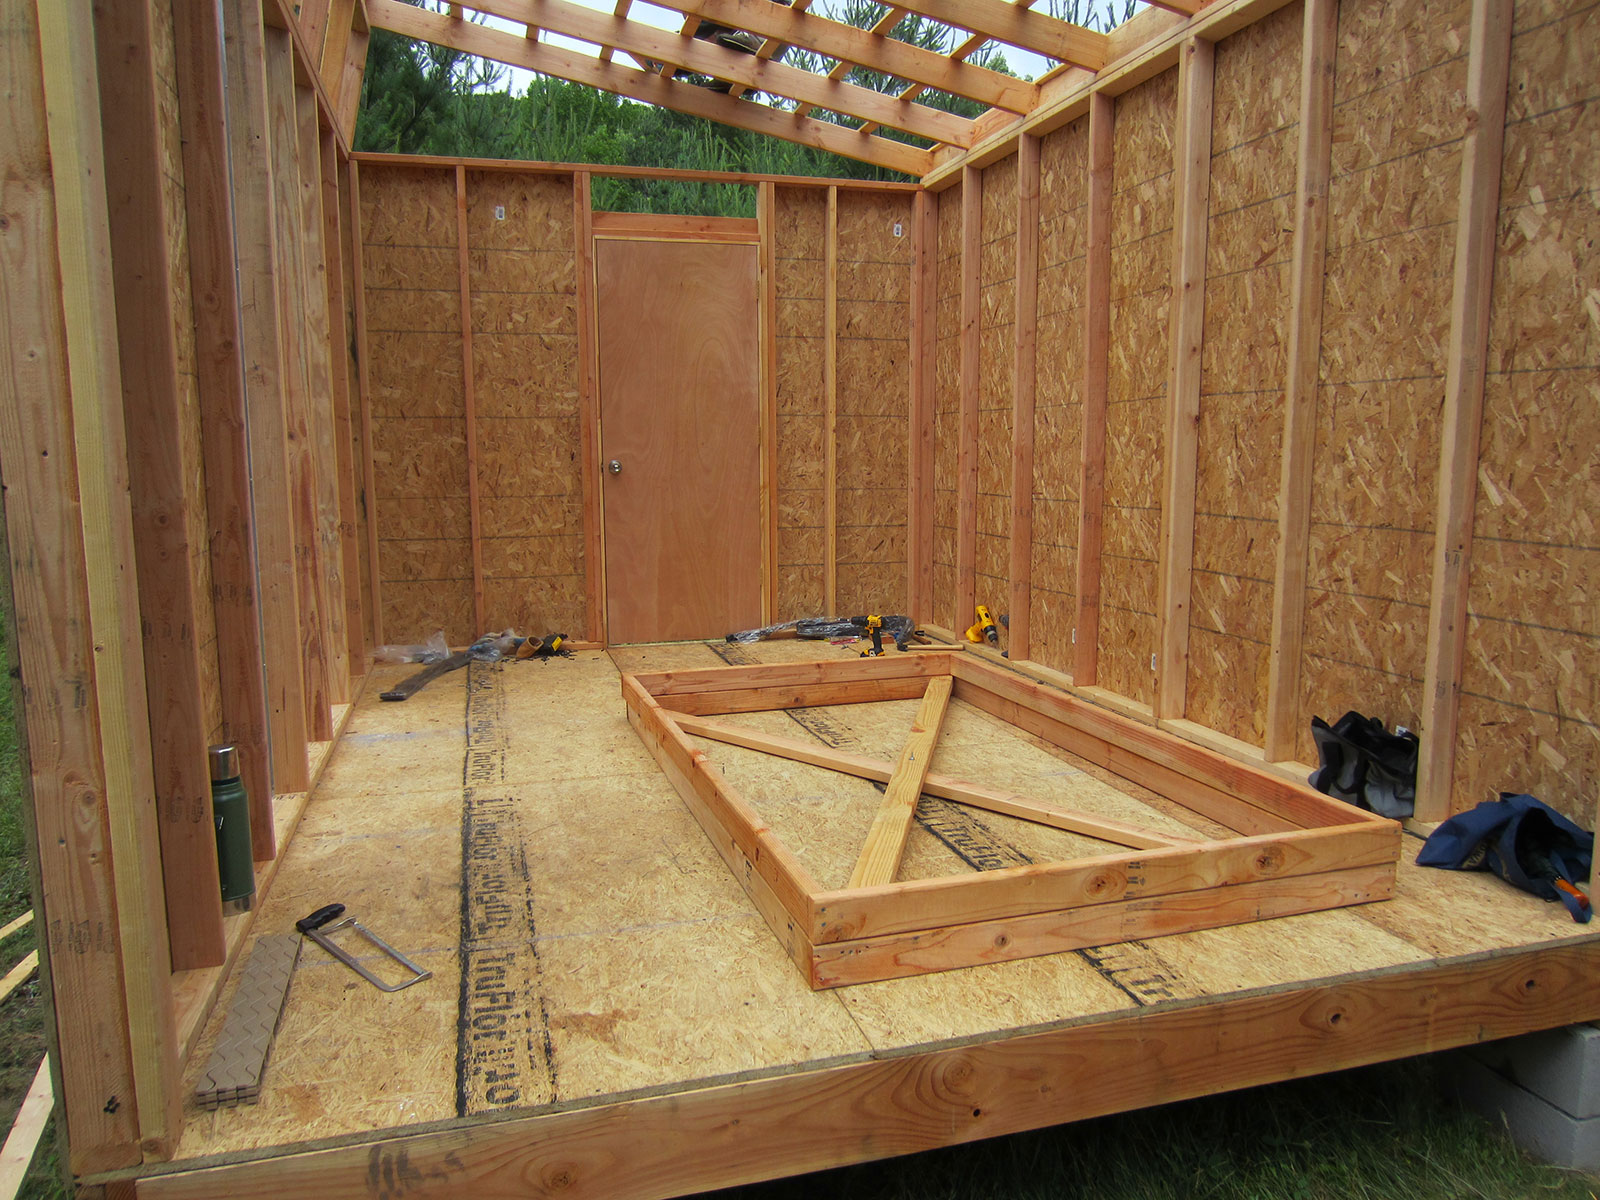
We made our floor frame in two pieces. One 8' x 10' and one 6' x 10'. The joists are spaced 16" apart from one another (on center), with the exception of the odd measurements in the last joists from the door and barn door ends.
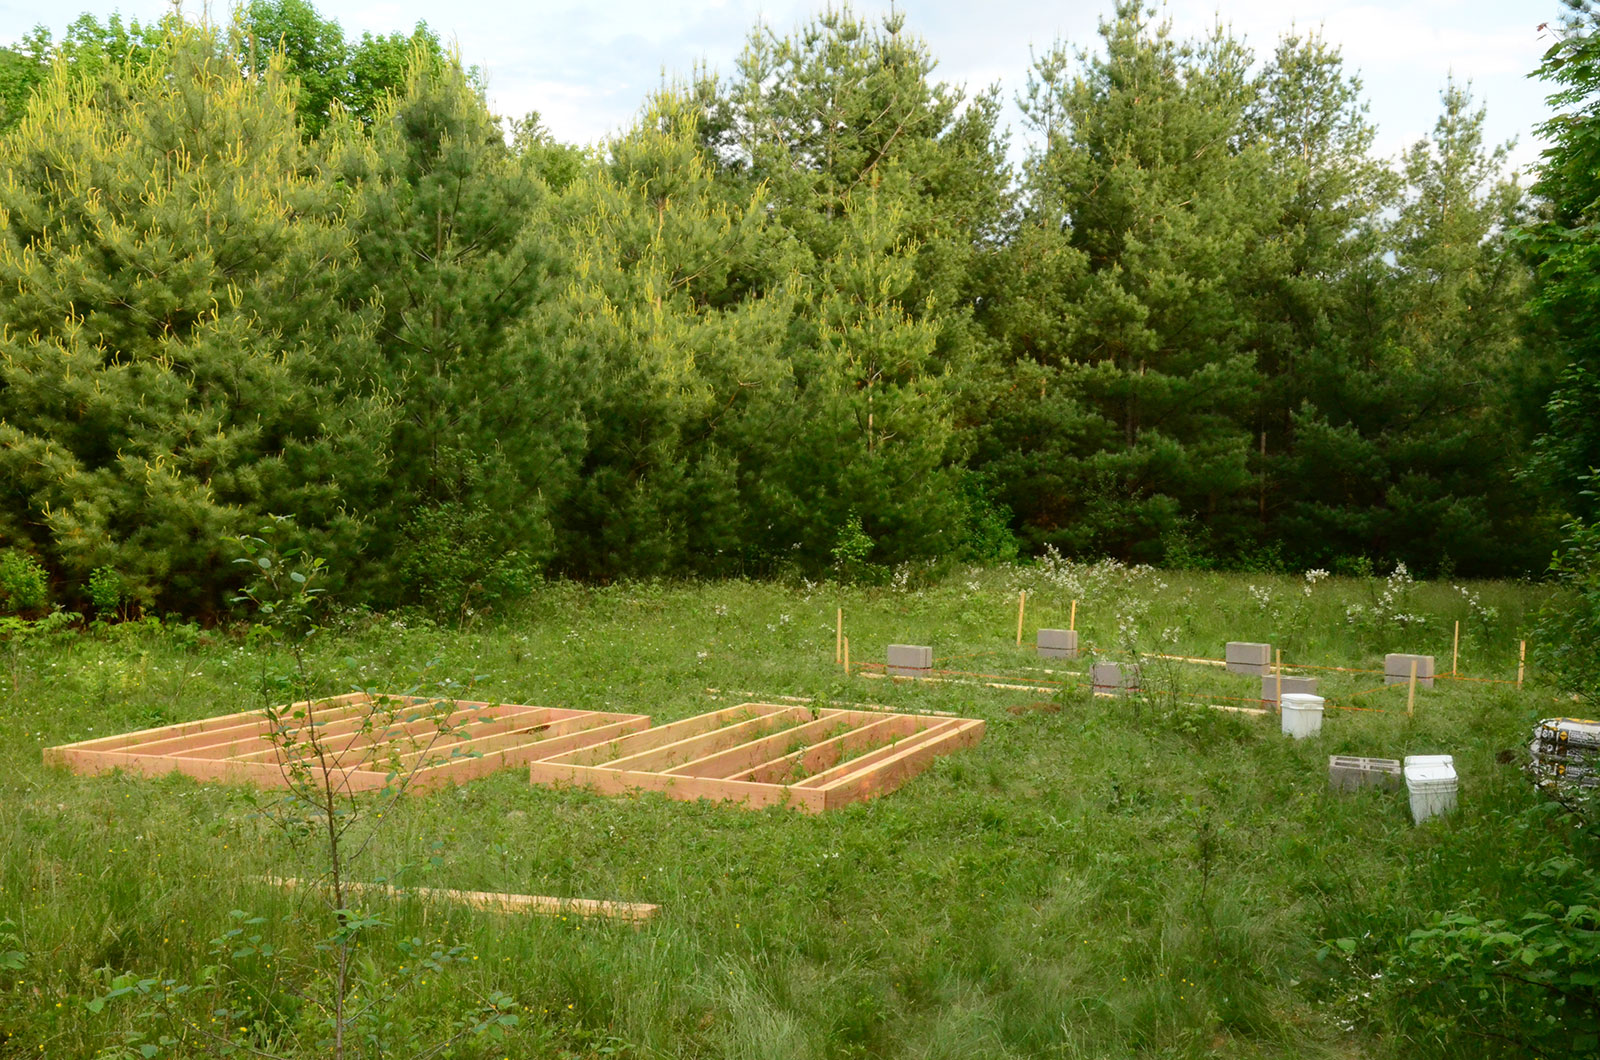
The joists at the door end and the barn door end are doubled for extra support, as are the two by tens at six- and eight-foot lengths running along the front and rear wall sides. The photograph of the blocking below shows this explicitly. They are finished with two by sixes running underneath the frame along the rear and front wall sides, to attach to the anchor bolts in the cement blocks.
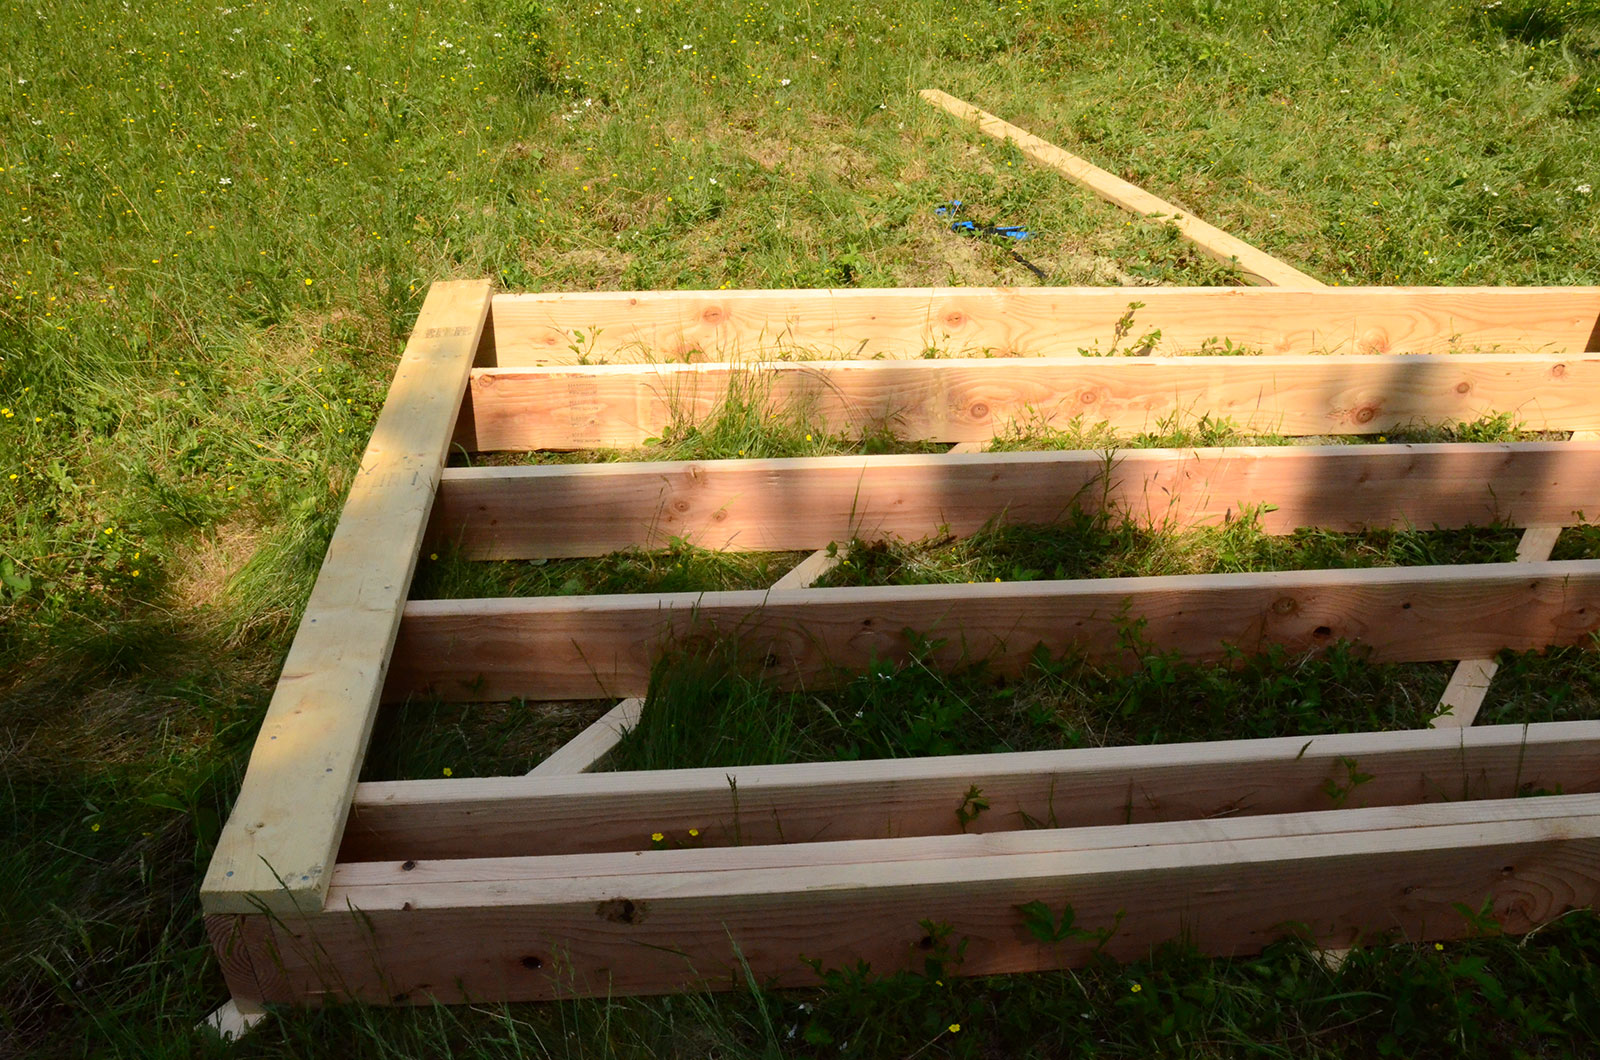
Before you install the floor, the joists must be reinforced with blocking. The blocking should be attached so that the left side of the first piece of blocking is on-center, then the right side of the second piece is on-center, and so on.

Drill holes in the two by sixes to align with the anchor bolts in the cement blocks and place the frame on the foundation. Screw a nut with a washer down onto the bolts. The diagonal furring strips you can see on the frame are keeping the frame square as it is being placed. Bolt the two frame pieces together by drilling through the joists where they meet, and using the carriage bolts with nuts and washers.
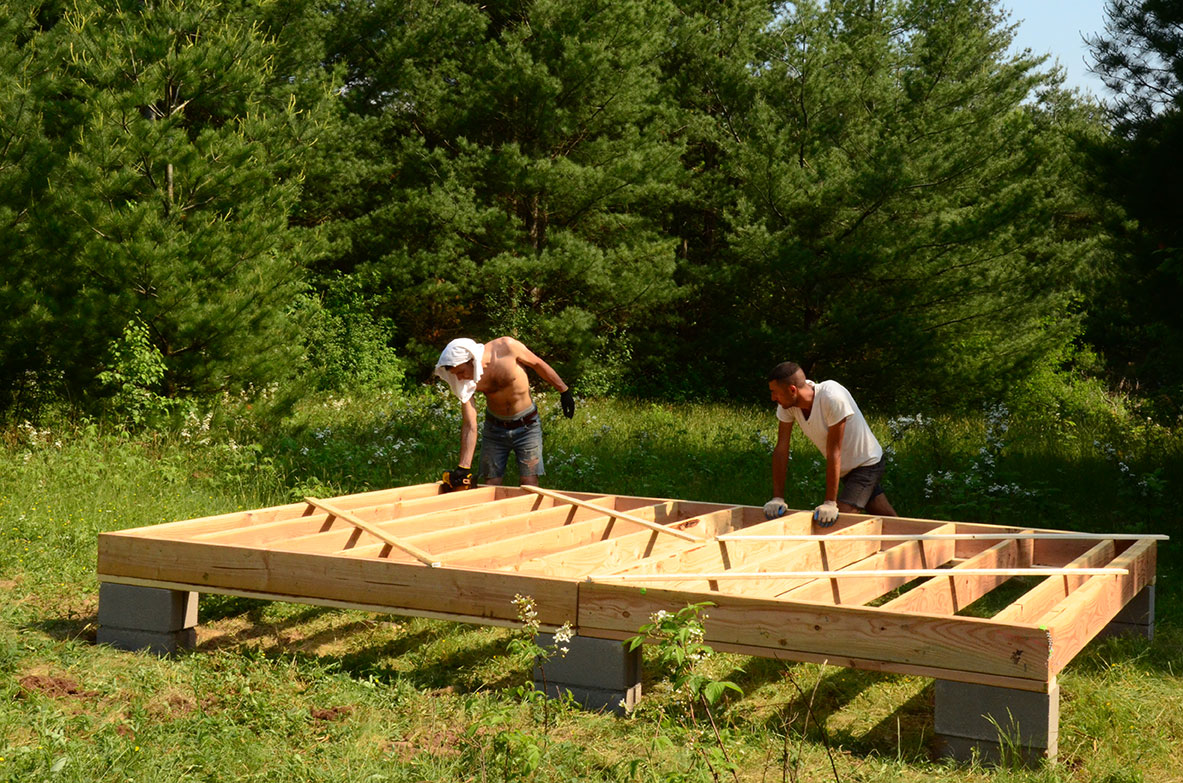
We used 3/4" tongue-and-groove OSB for our floor. You will have to cut down one sheet lengthwise, two sheets crosswise, and one sheet both crosswise and lengthwise to fit the frame.

You can use chalk lines to remind you where the joists are. Screw the OSB down to the joists.

Step 3: Framing the Front and Rear Walls
- (11) 2 x 4 x 92 1/4" [ANGLE CUT]
- (7) 2 x 4 x 72"
- (7) 2 x 4 x 96"
- (9) 2 x 4 x 21"
- (11) 2 x 4 x 92 59/64" [ANGLE CUT]
You will make the frames for the door-less walls in four pieces (two for each side). For each side, one piece will be 6' long and one 8', just as you made the floor frame. These are the FRONT and REAR wall frames. There will be an additional two pieces (one 6' and one 8' long) that will provide the extra height on the tall side. This is the UPPER wall frame. [IMPORTANT NOTE!!!!!: THE FIRST DIAGRAM BELOW HAS ONE EXTRA TWO BY FOUR ON TOP OF THE UPPER WALL FRAME, WHICH IS NOT IN THE SECOND DIAGRAM. You will notice in the photographs that we built one studio with the extra two by four on top of the upper frame, and one without. The choice will change the grade of your roof but not much else. Do as you see fit. The cut list does not include the extra piece.]
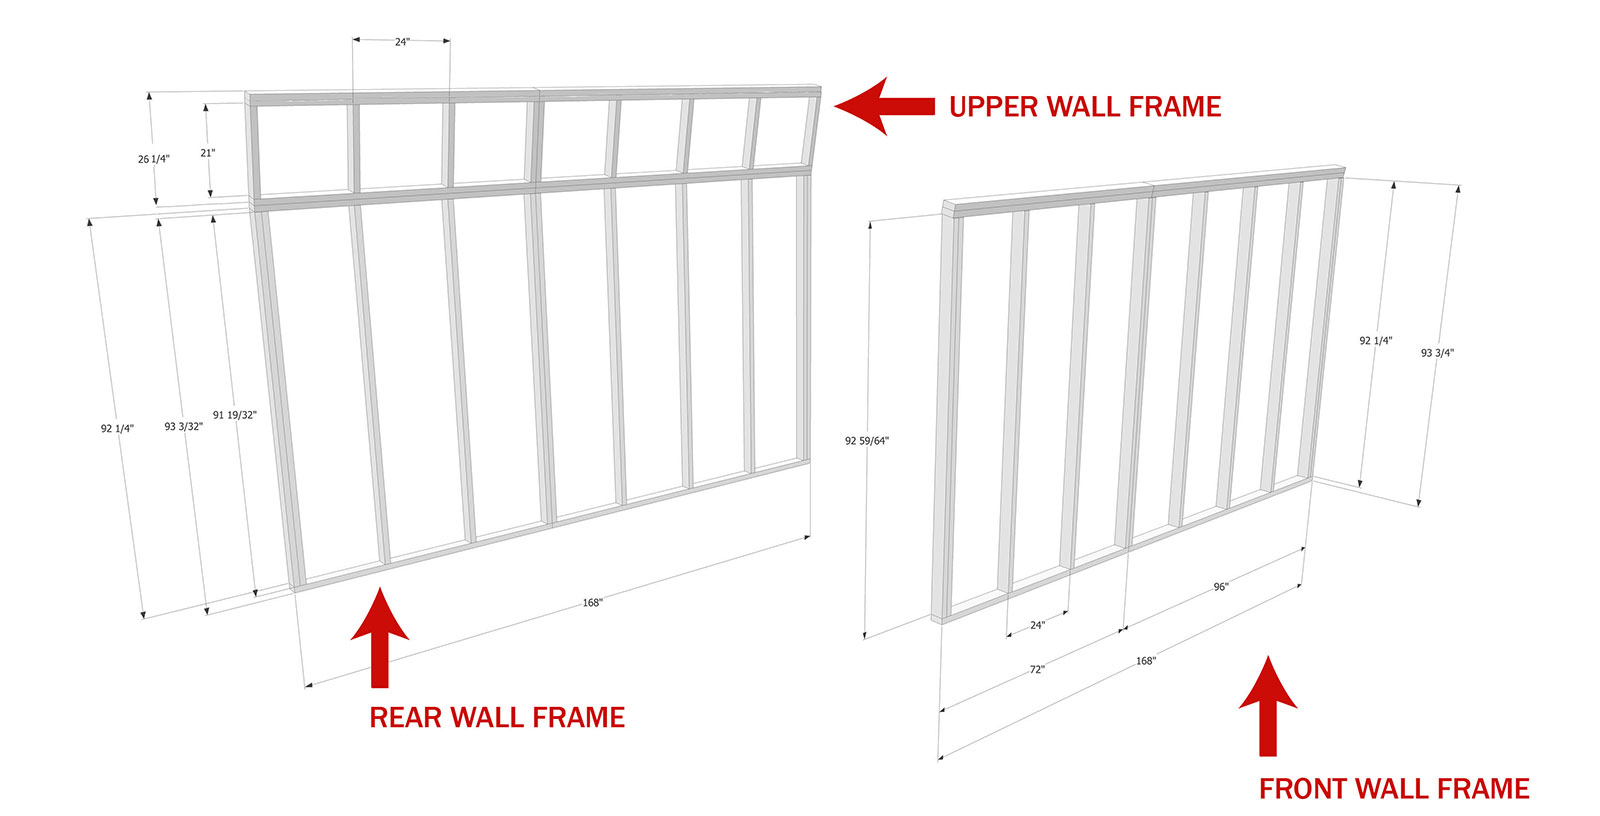
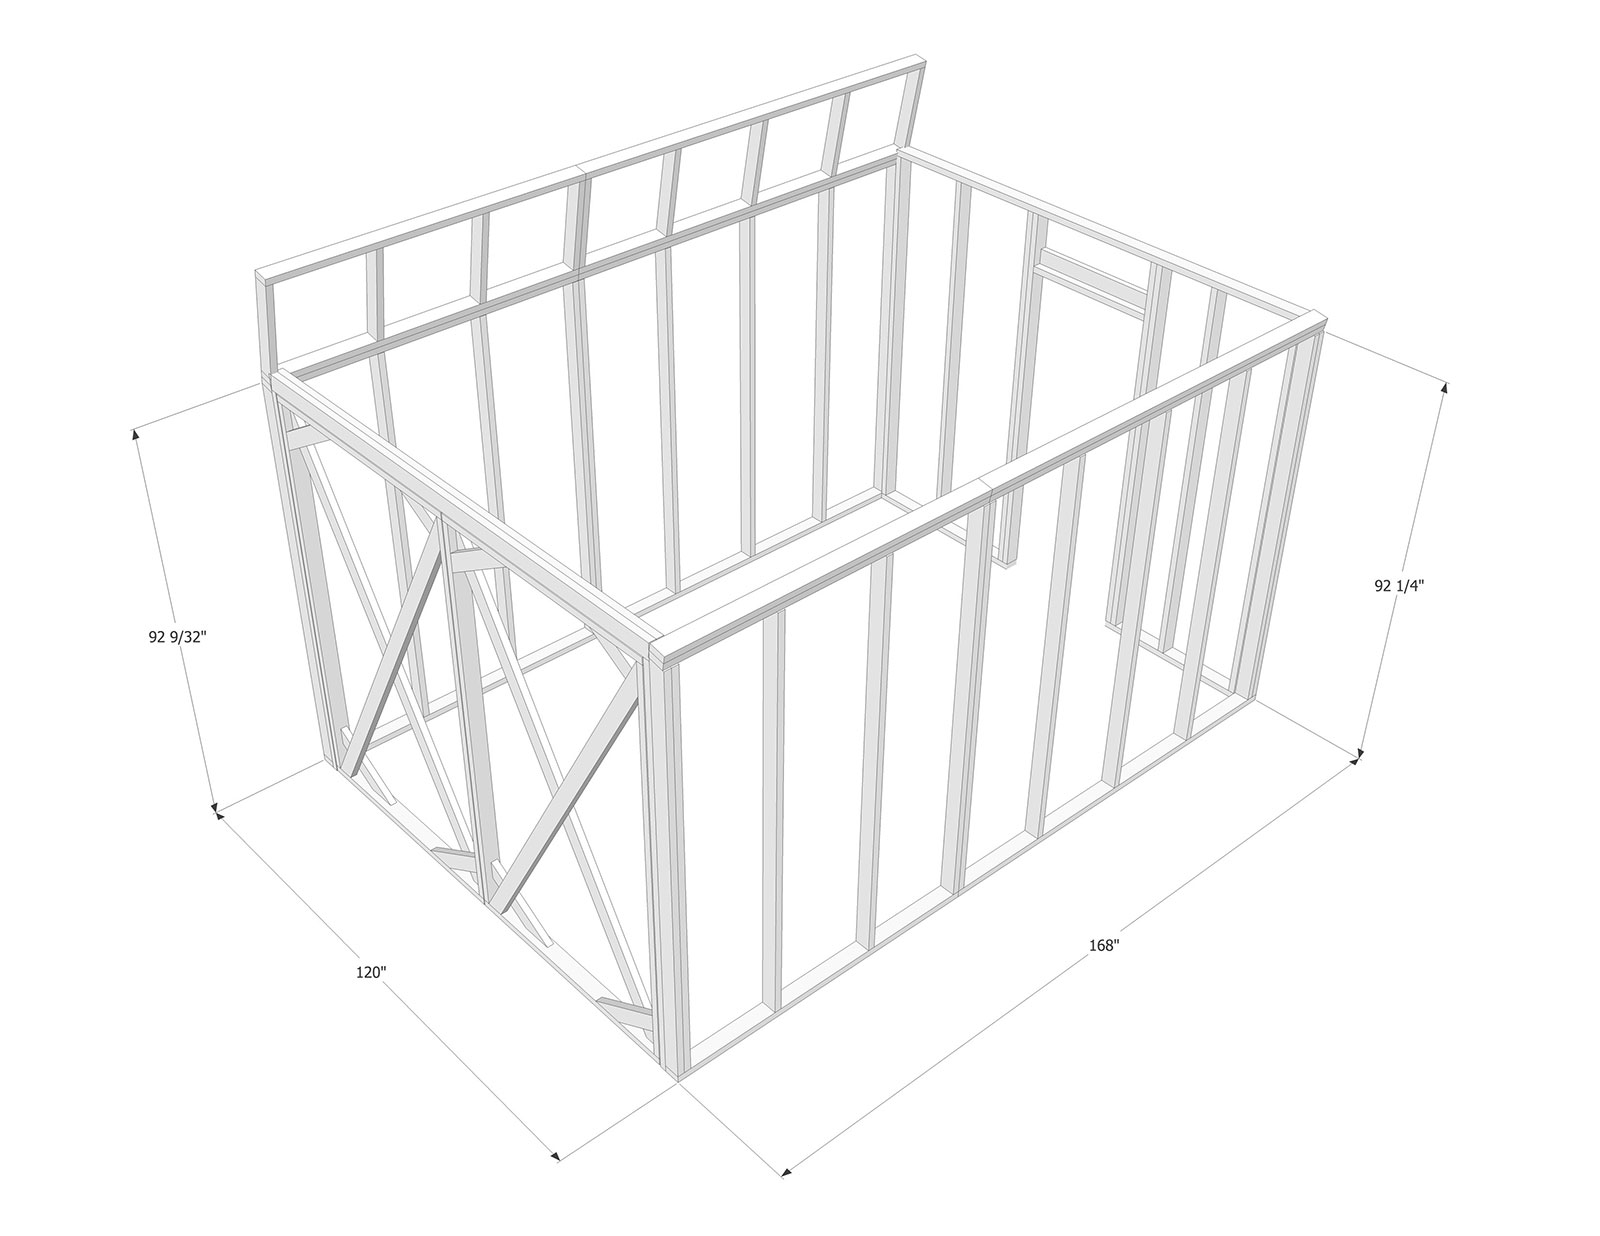
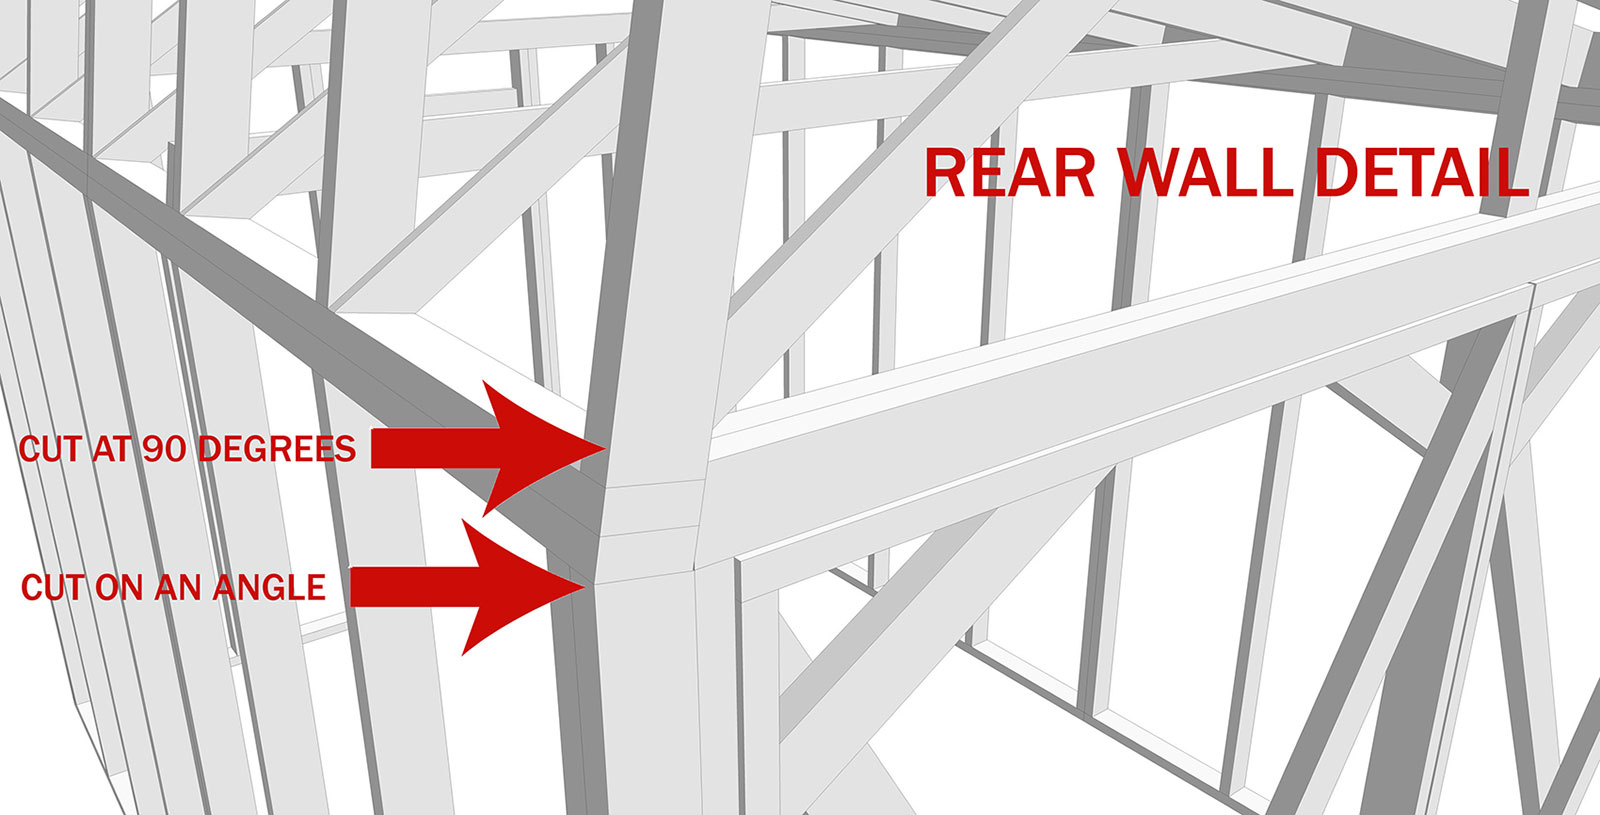
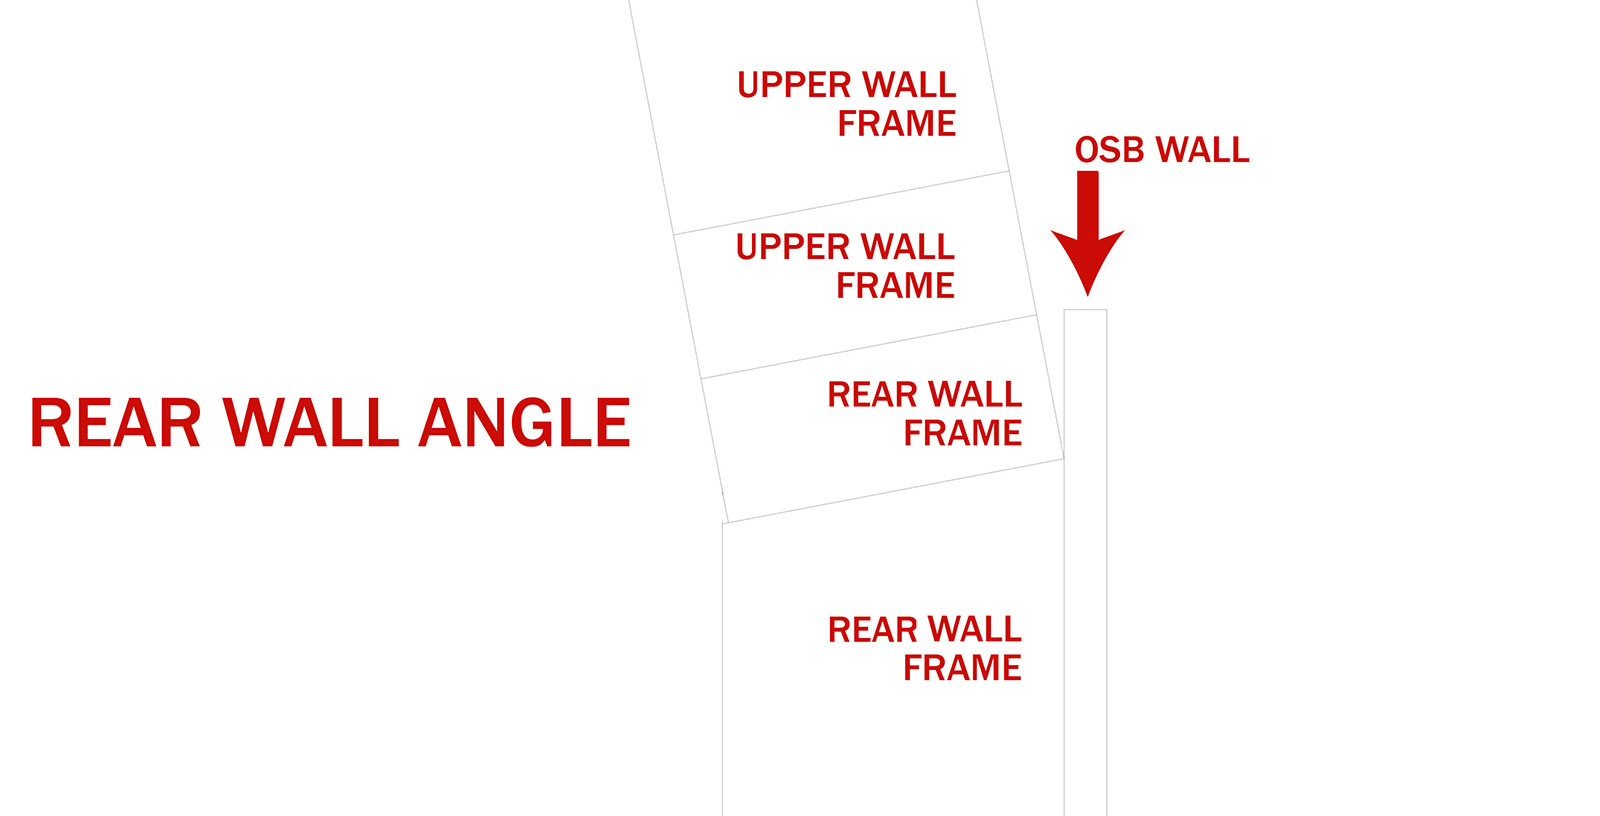
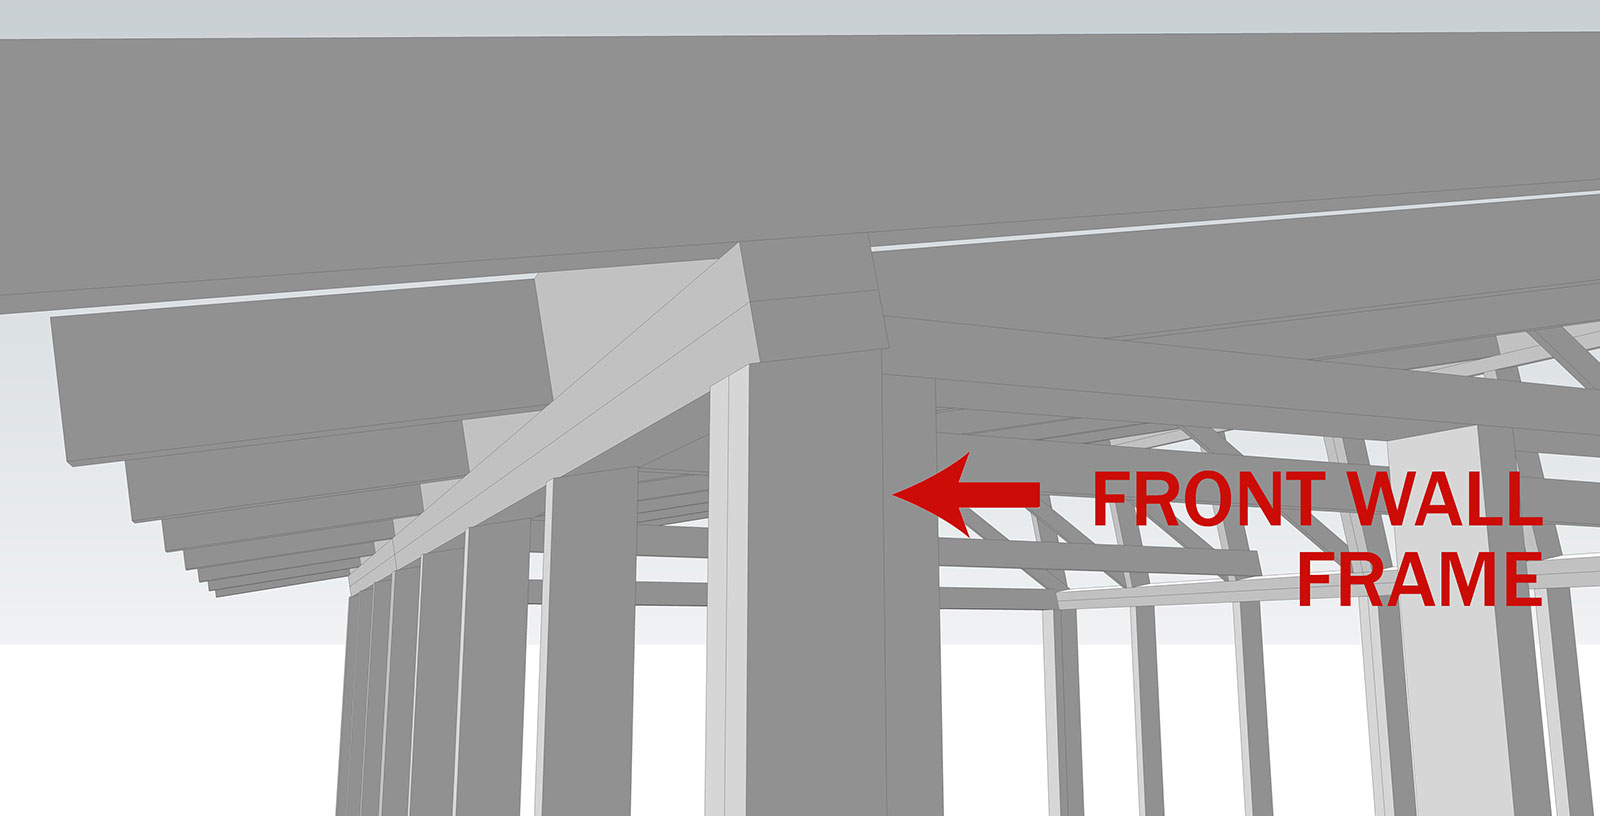
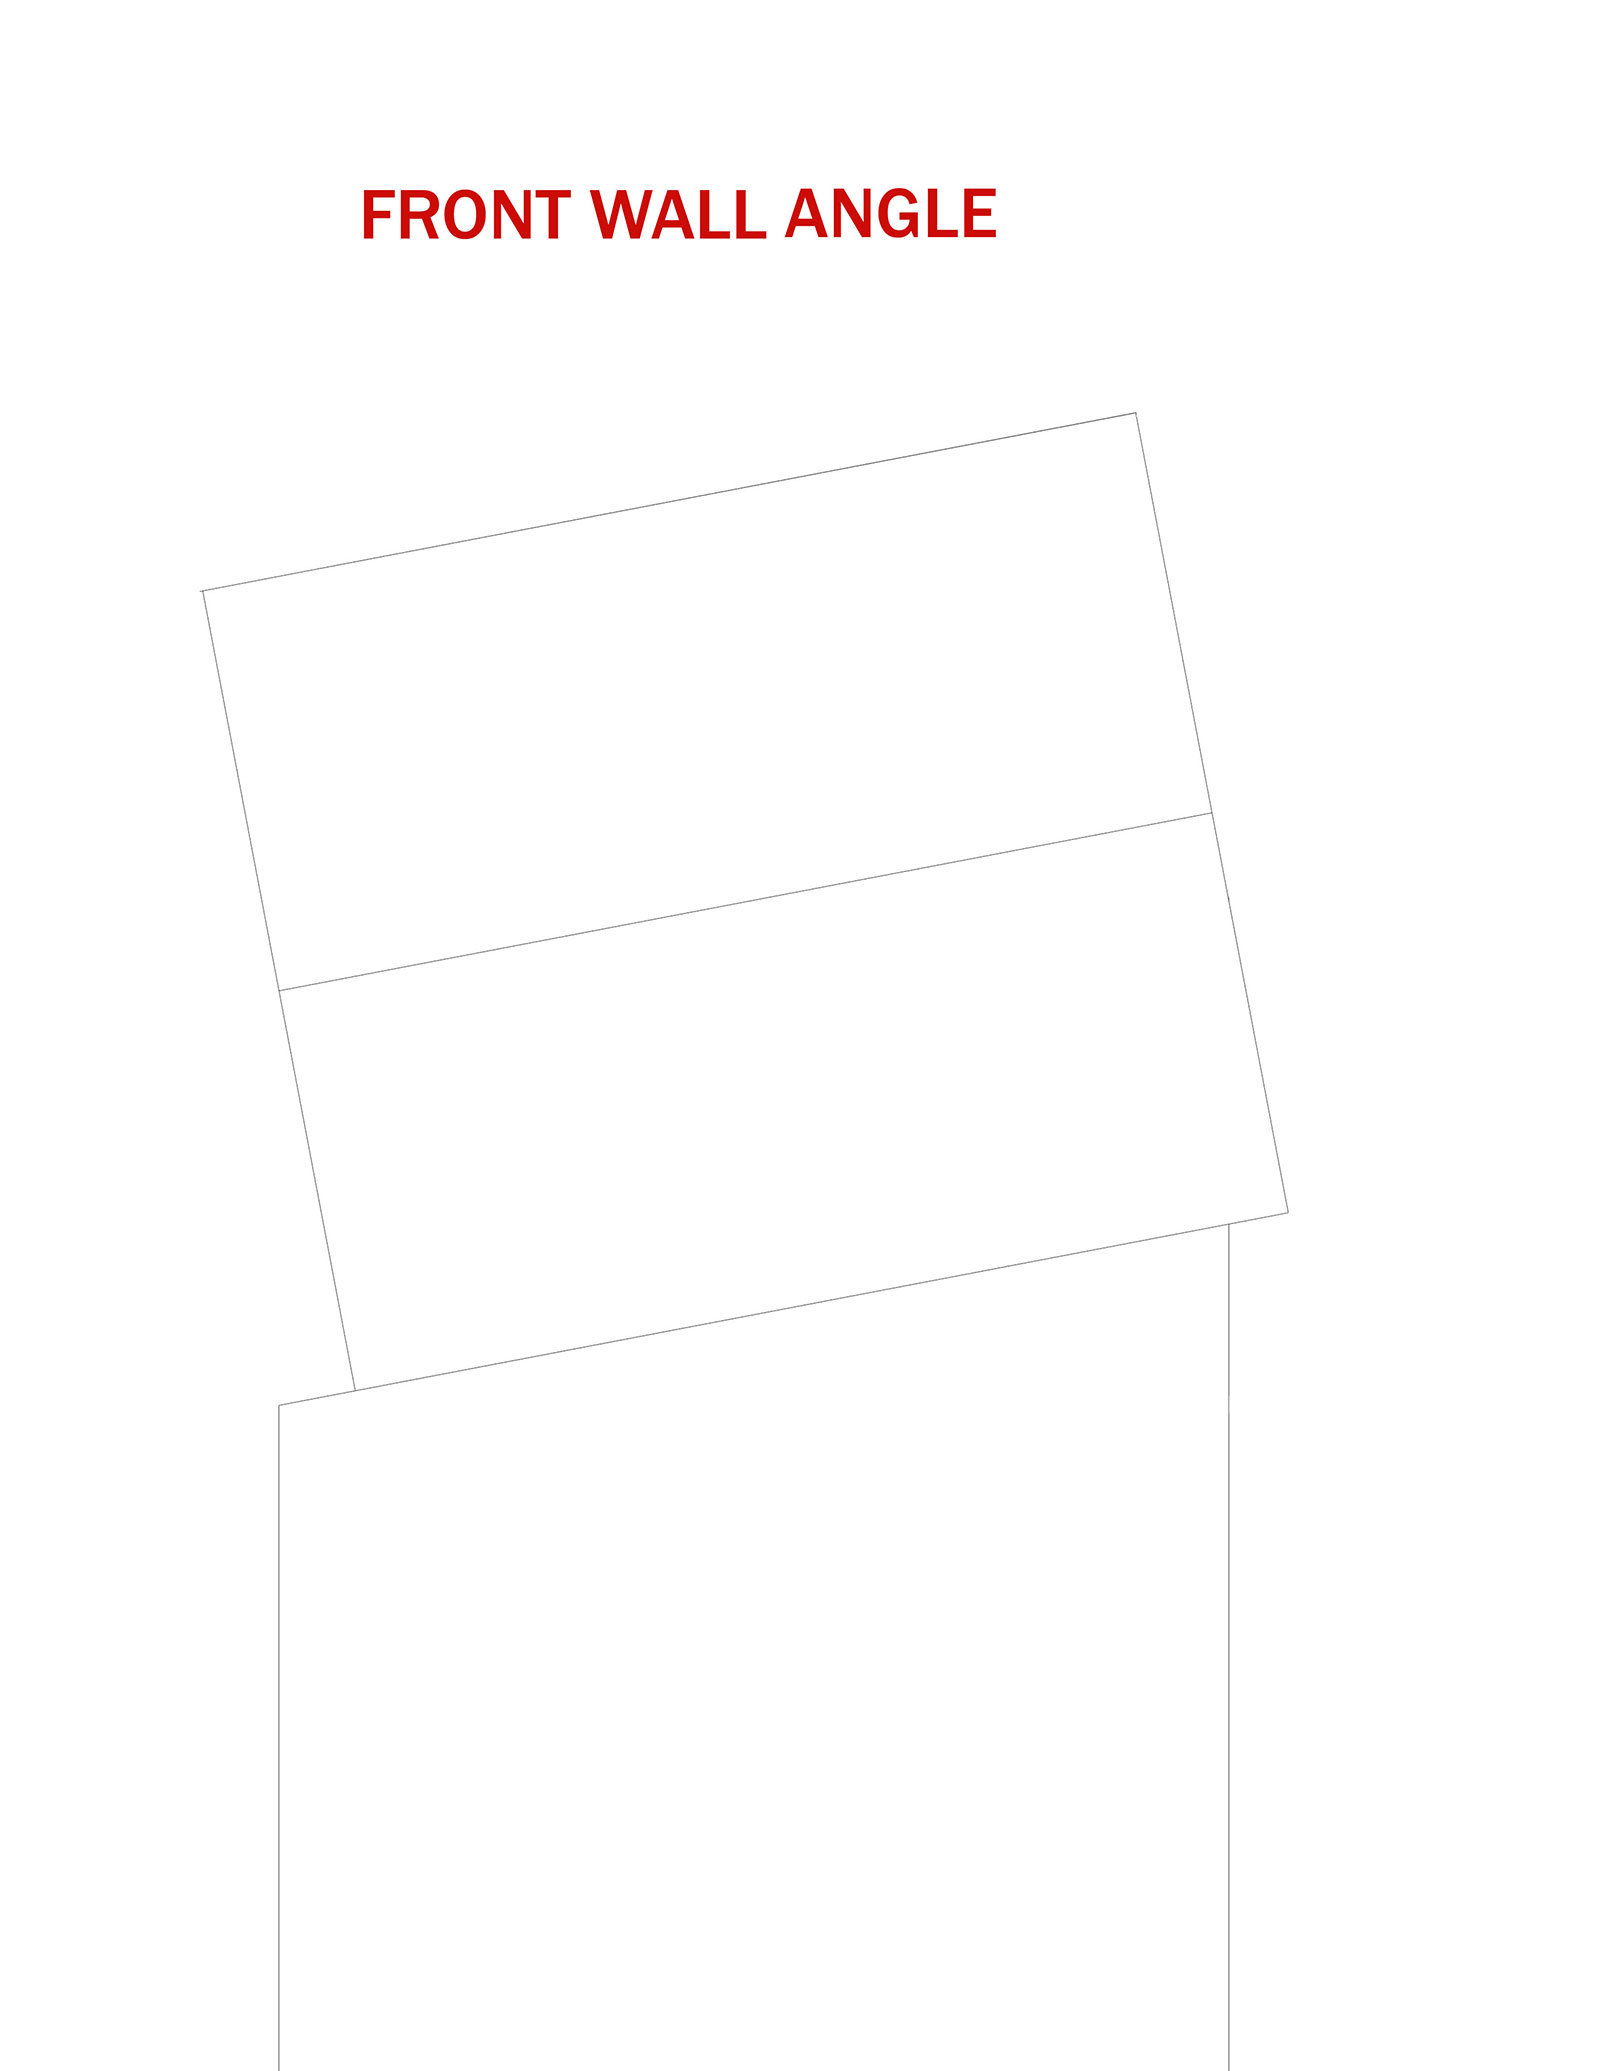
The tall side is described as the REAR wall (completed by the upper wall frame), the short side as the FRONT wall. The studs for both the front and rear wall frames will have slight angles at their top. You can determine the angles using the measurements above and the example angles in the images below.
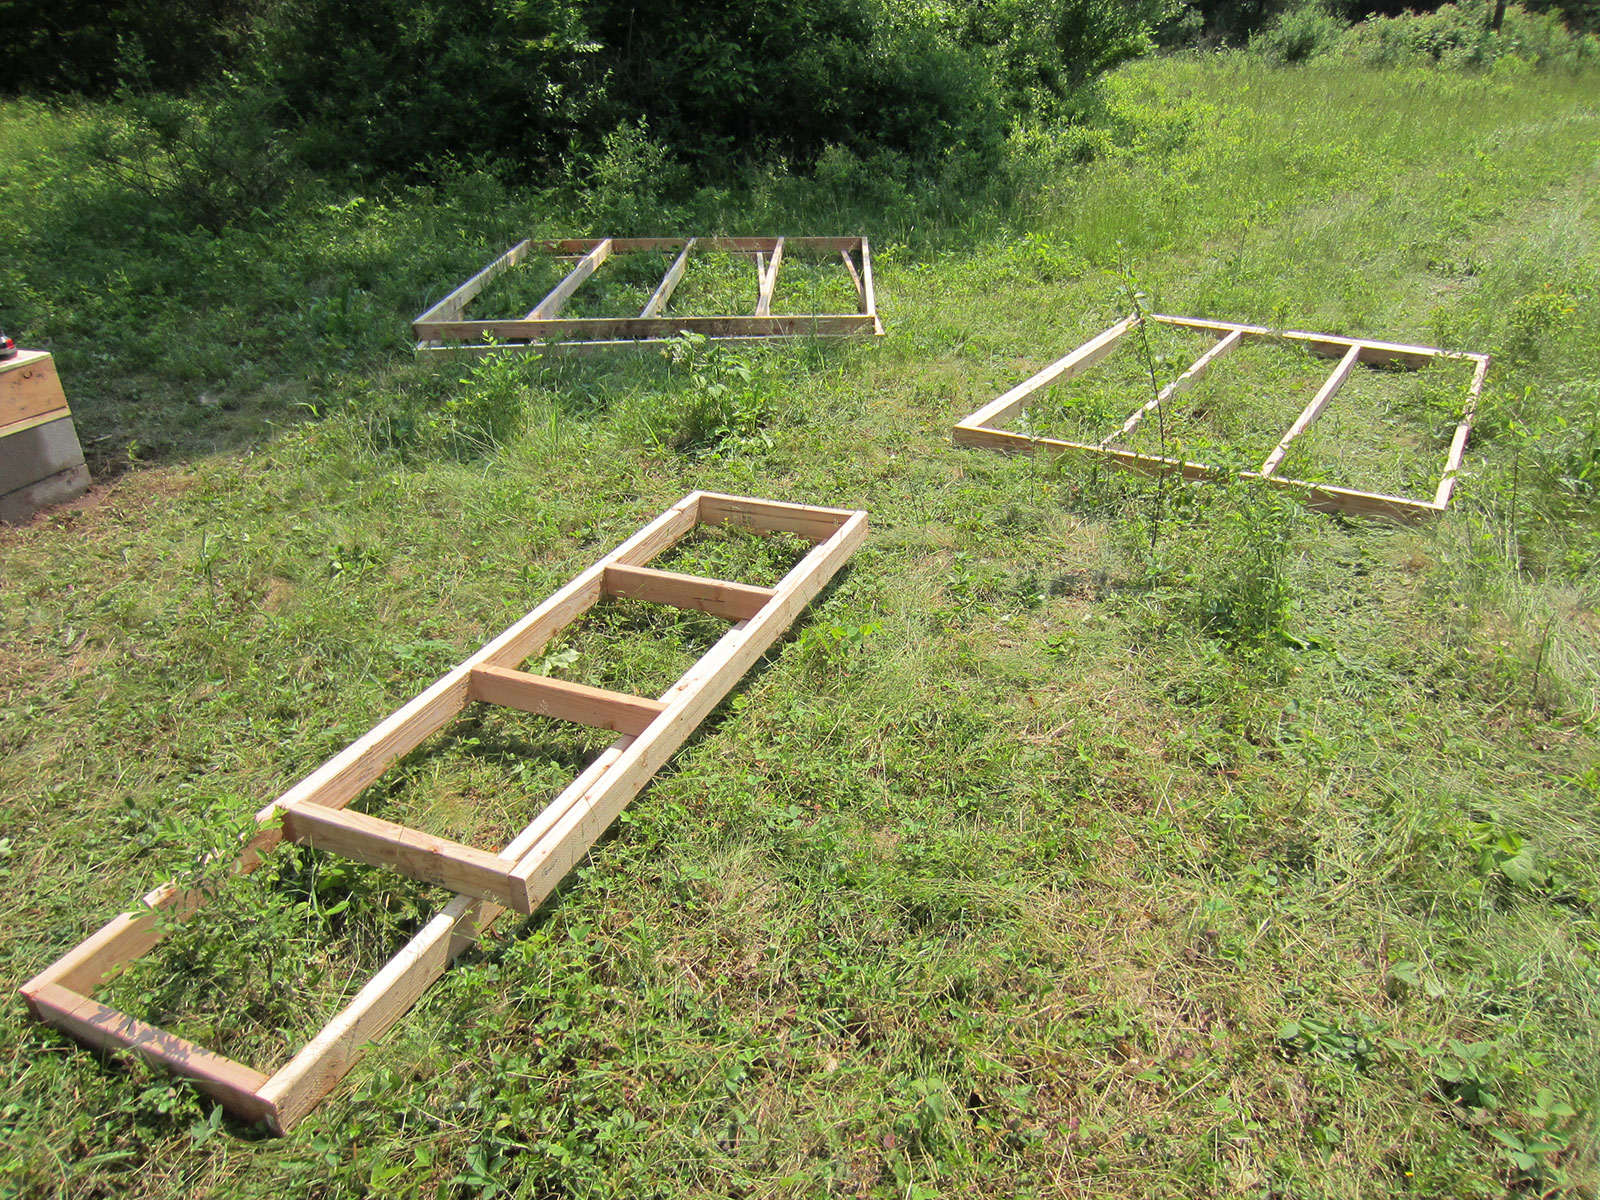
You can see five of the six pieces of the door-less wall frames in the photograph below. The two in the foreground make the upper wall frame, the two in the back on the left are the 8' sections of the front and rear wall frames, and on the right is the 6' section of the front wall frame.
Screw the two pieces of the upper frame to the corresponding pieces of the rear wall frame.
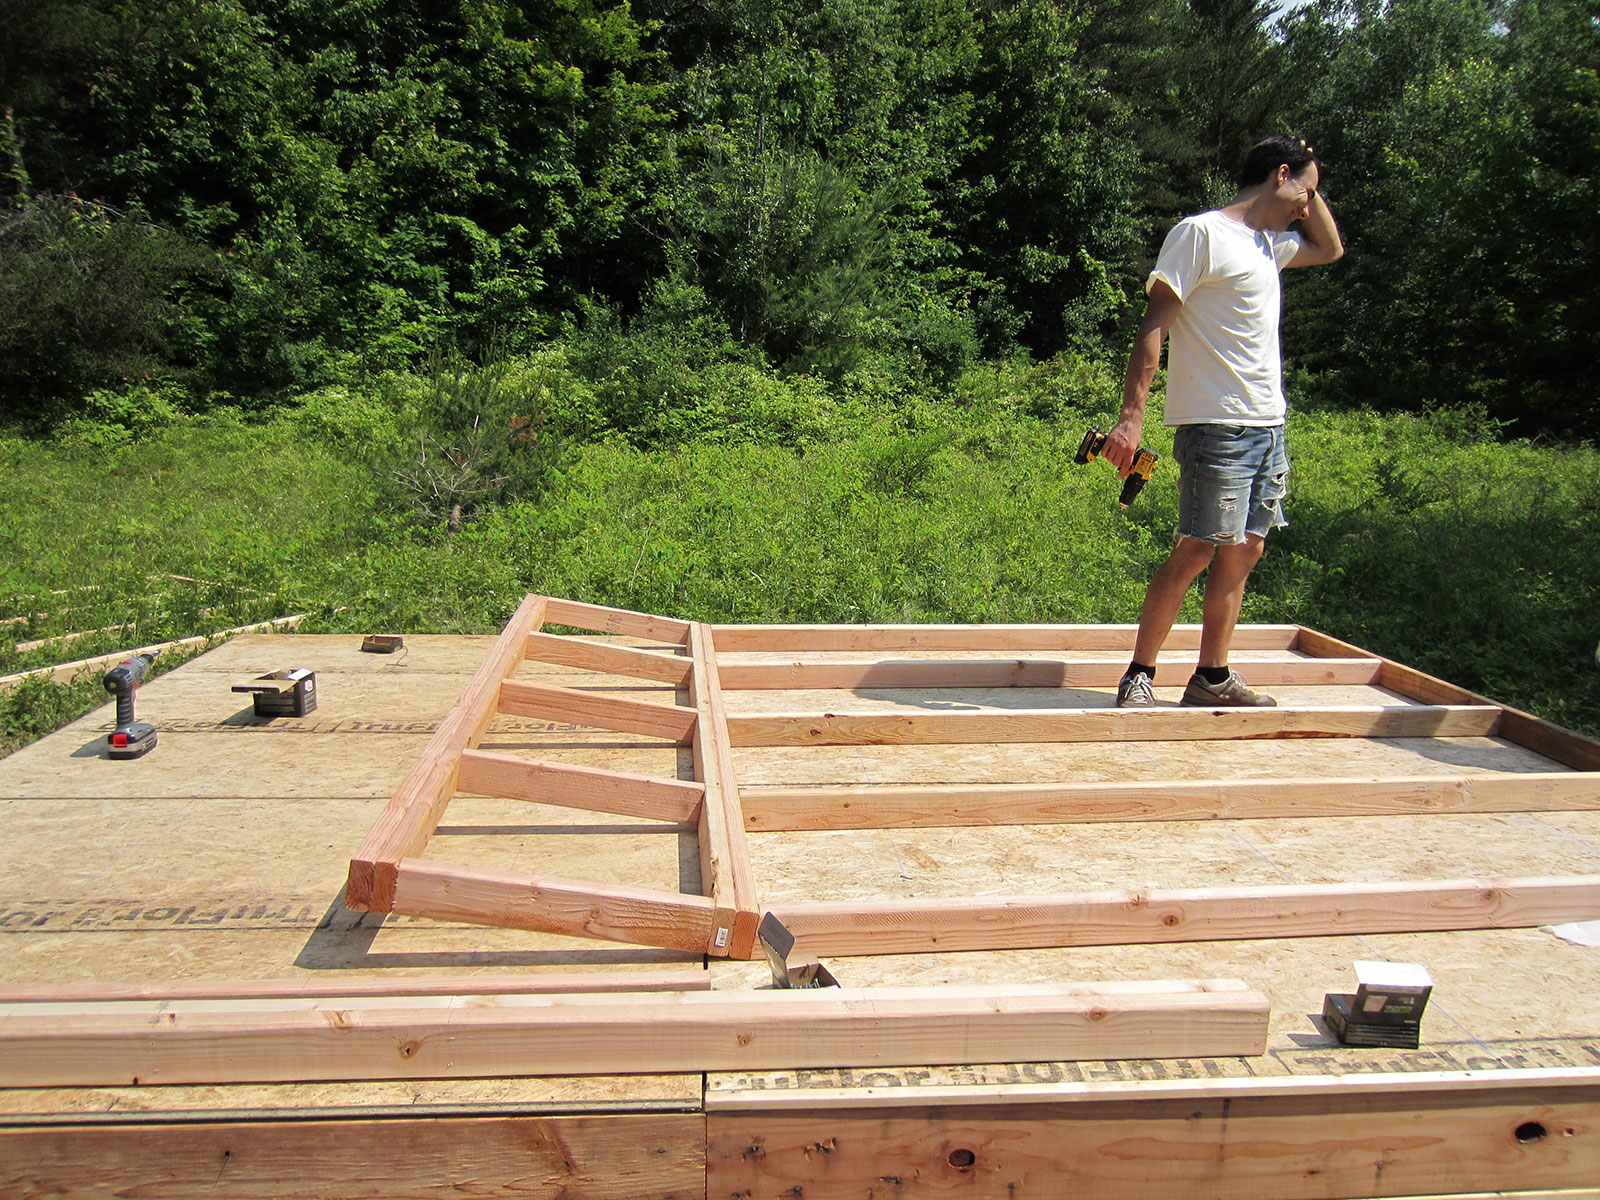
Erect the 6' and 8' pieces of conjoined upper wall frame and rear wall frame one by one. Make sure you screw them to the floor and each other, and that they will fit square with the other frames.
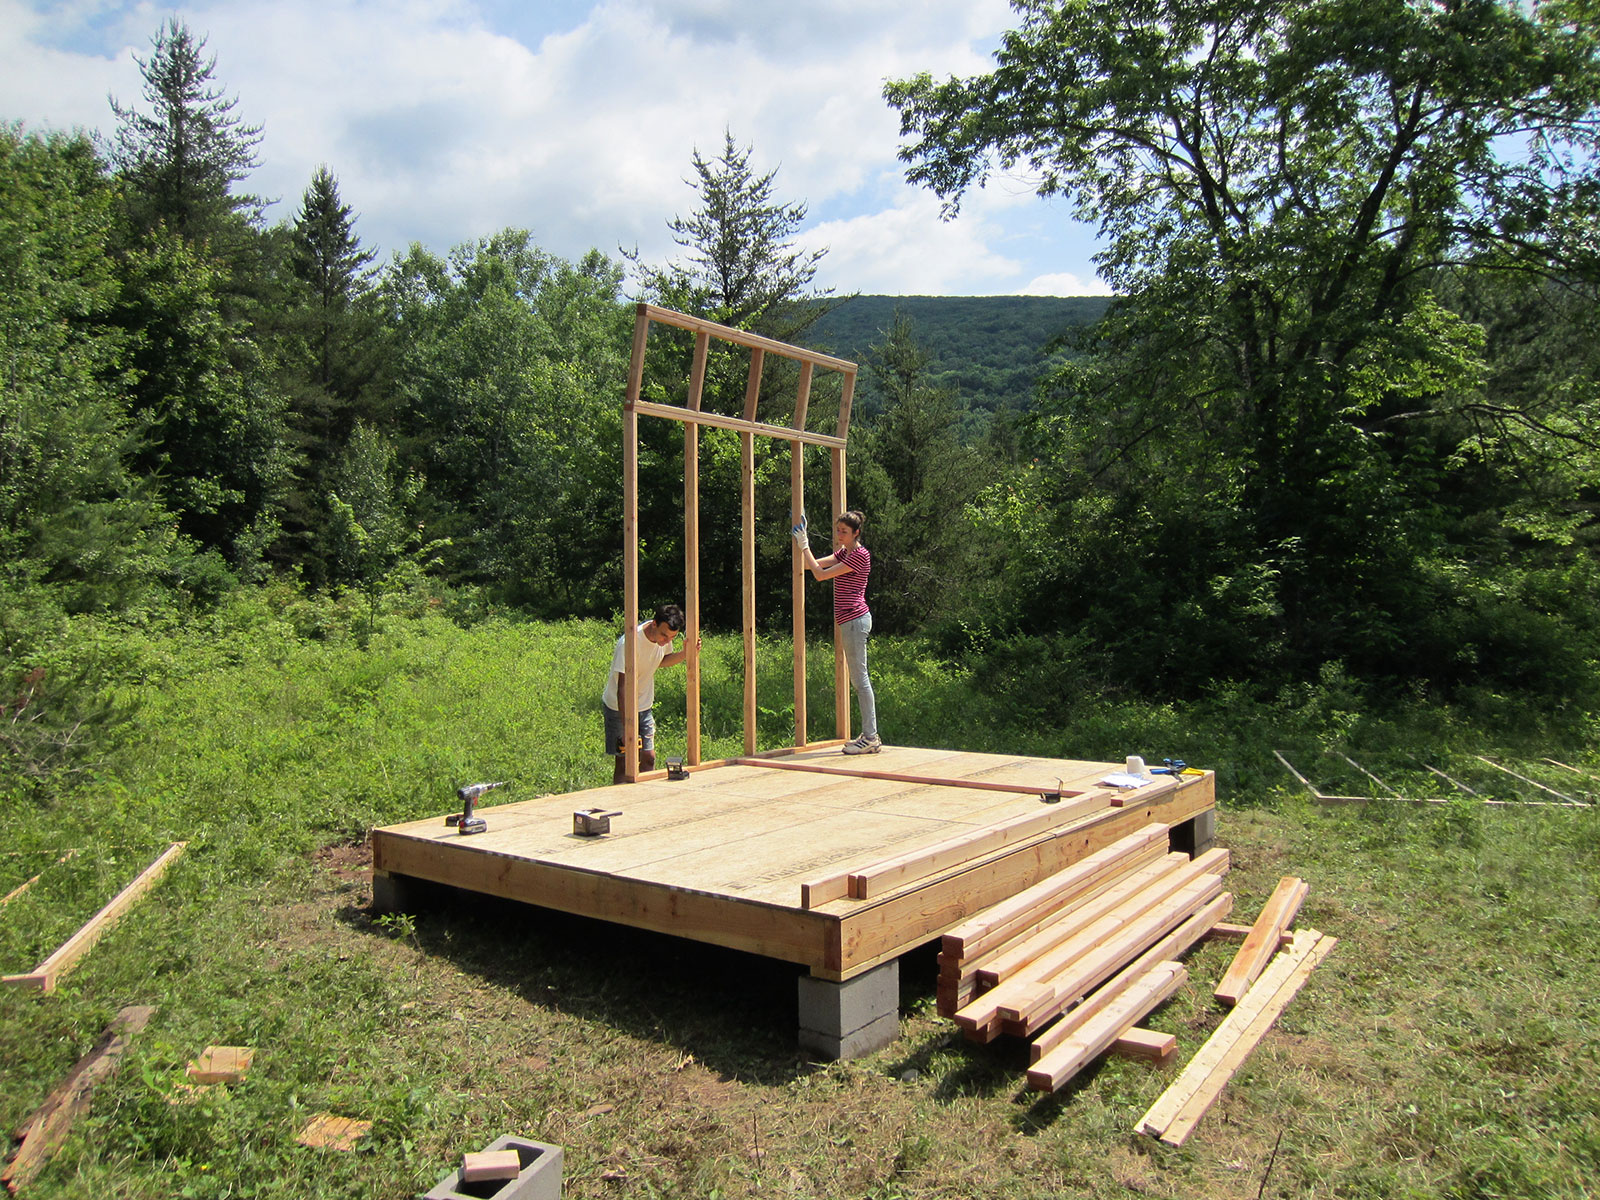
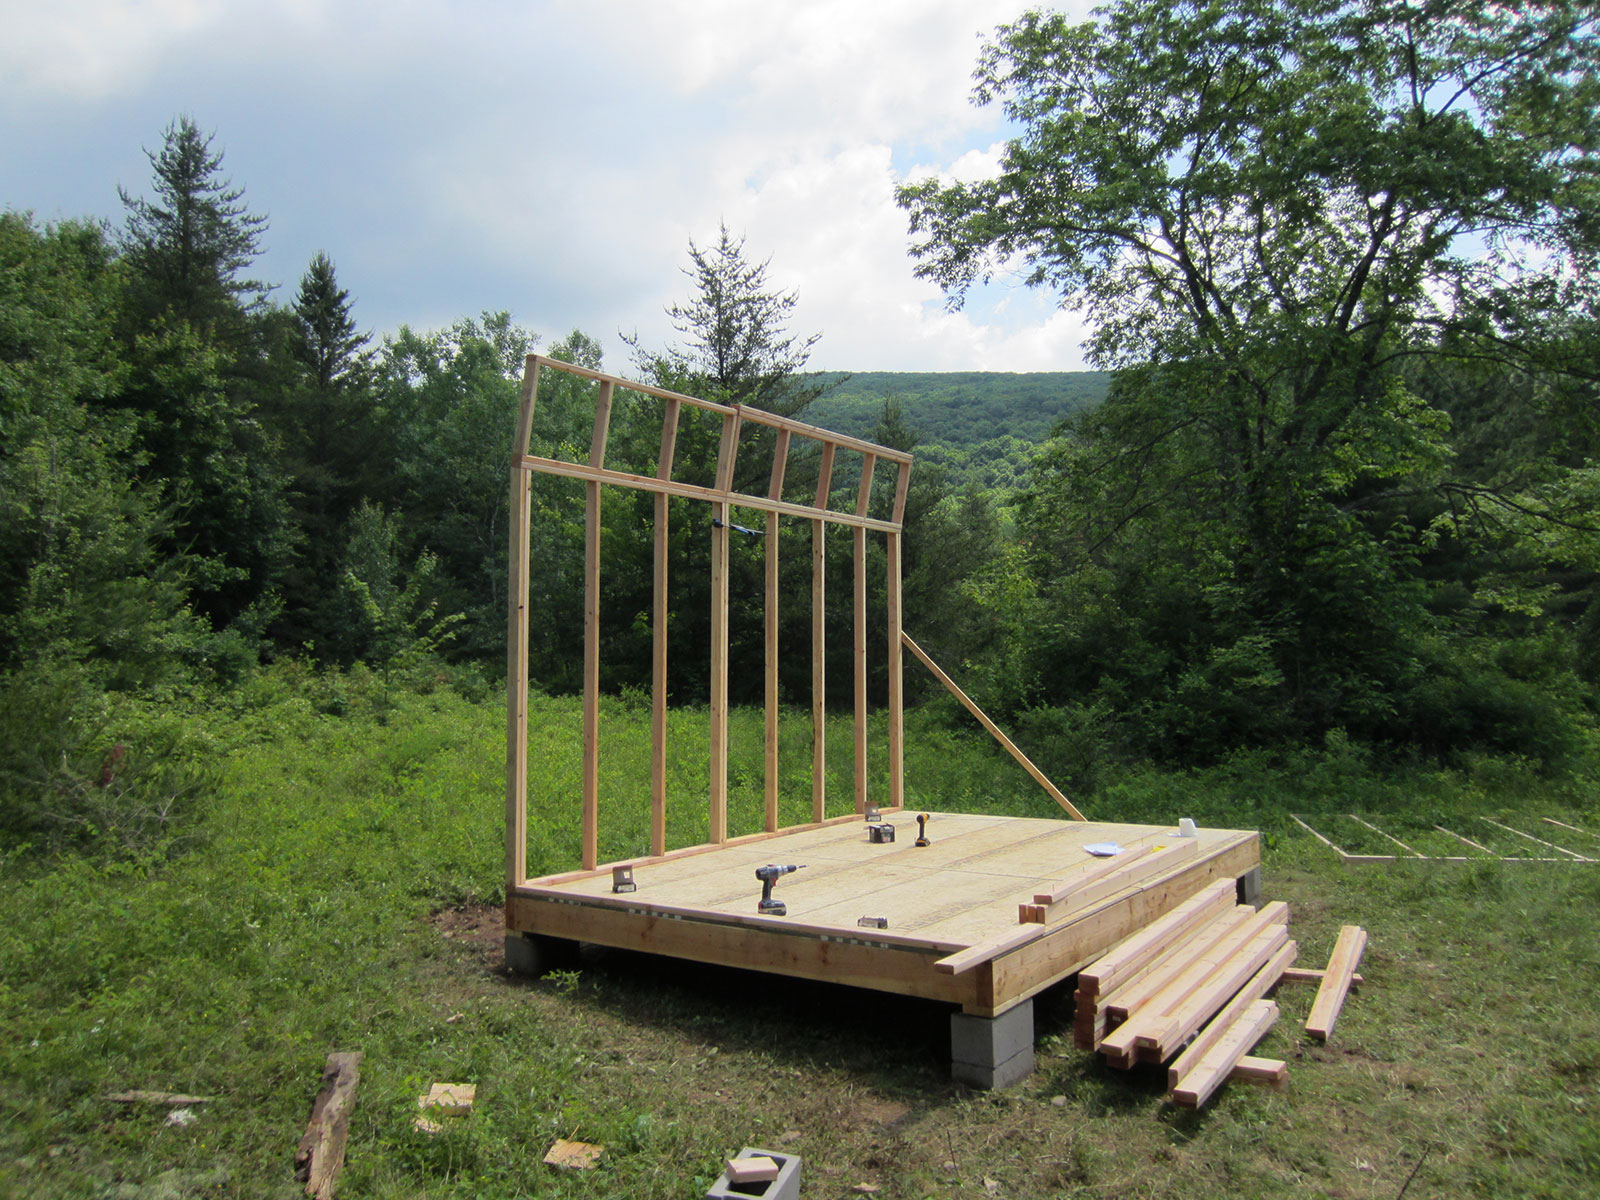
Erect the 6' and 8' pieces of the front wall frame.
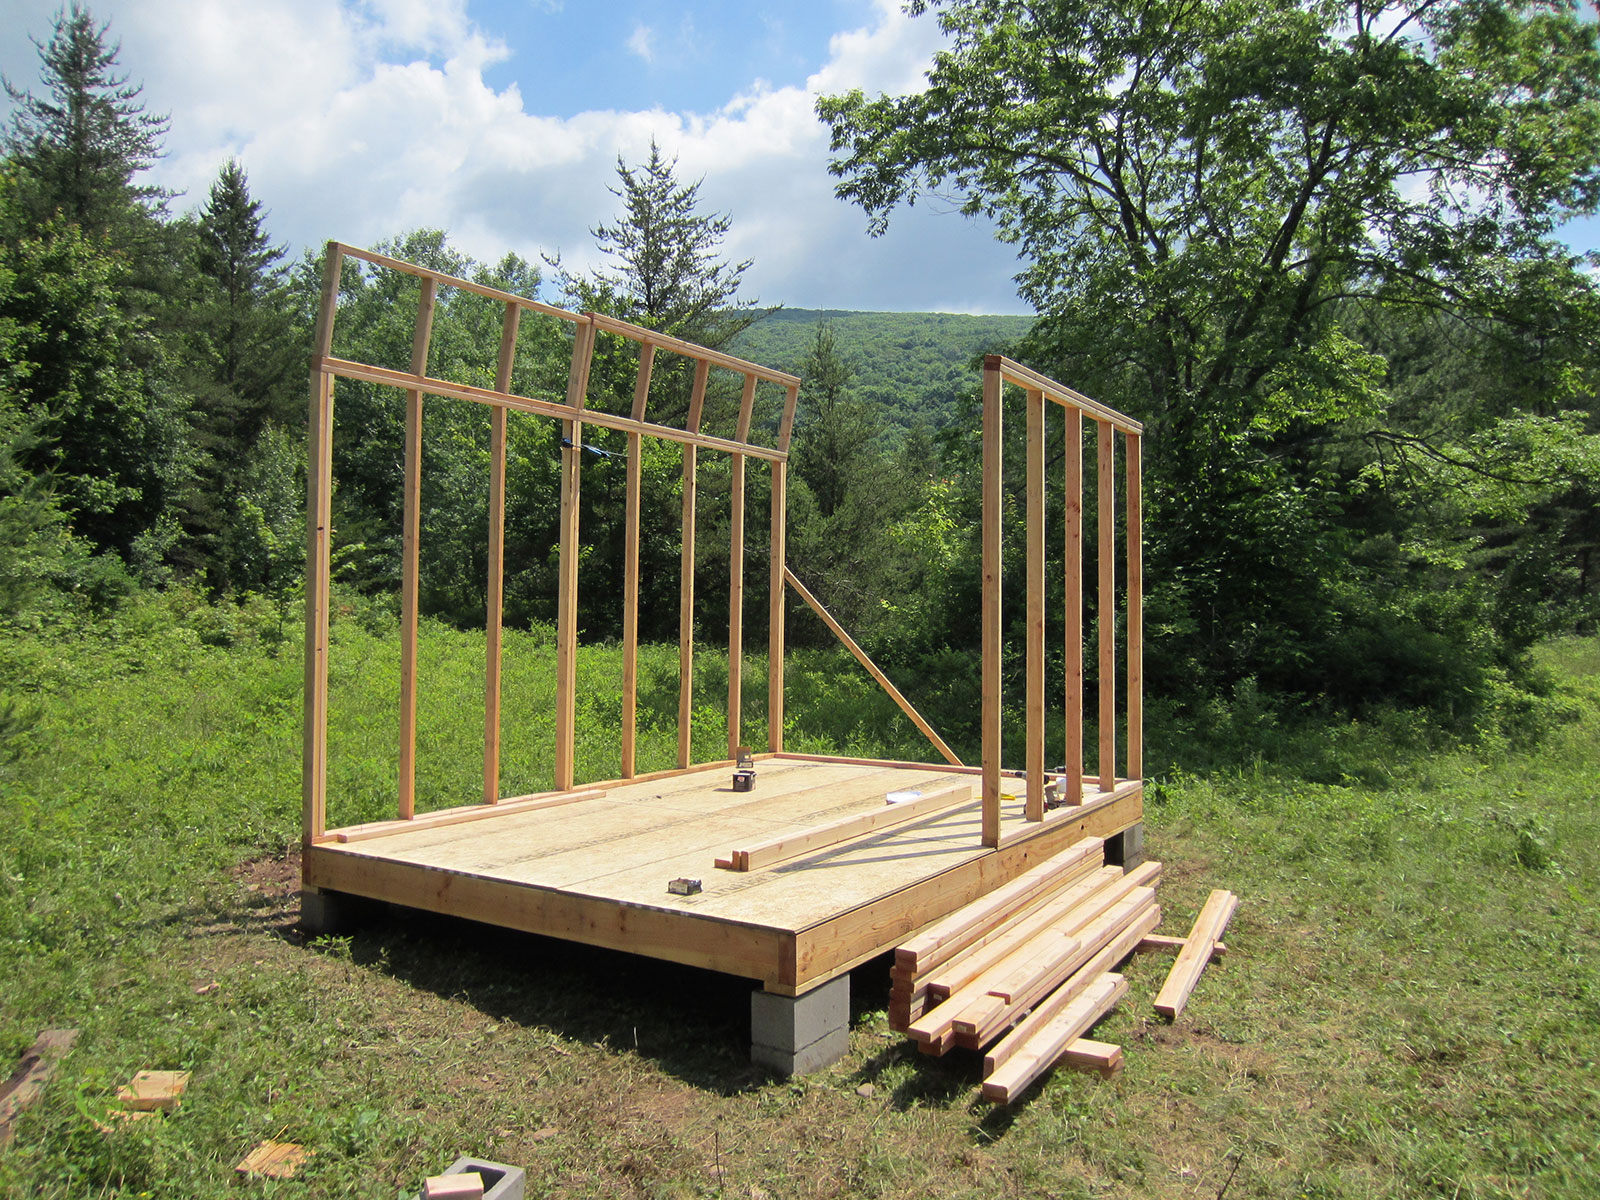
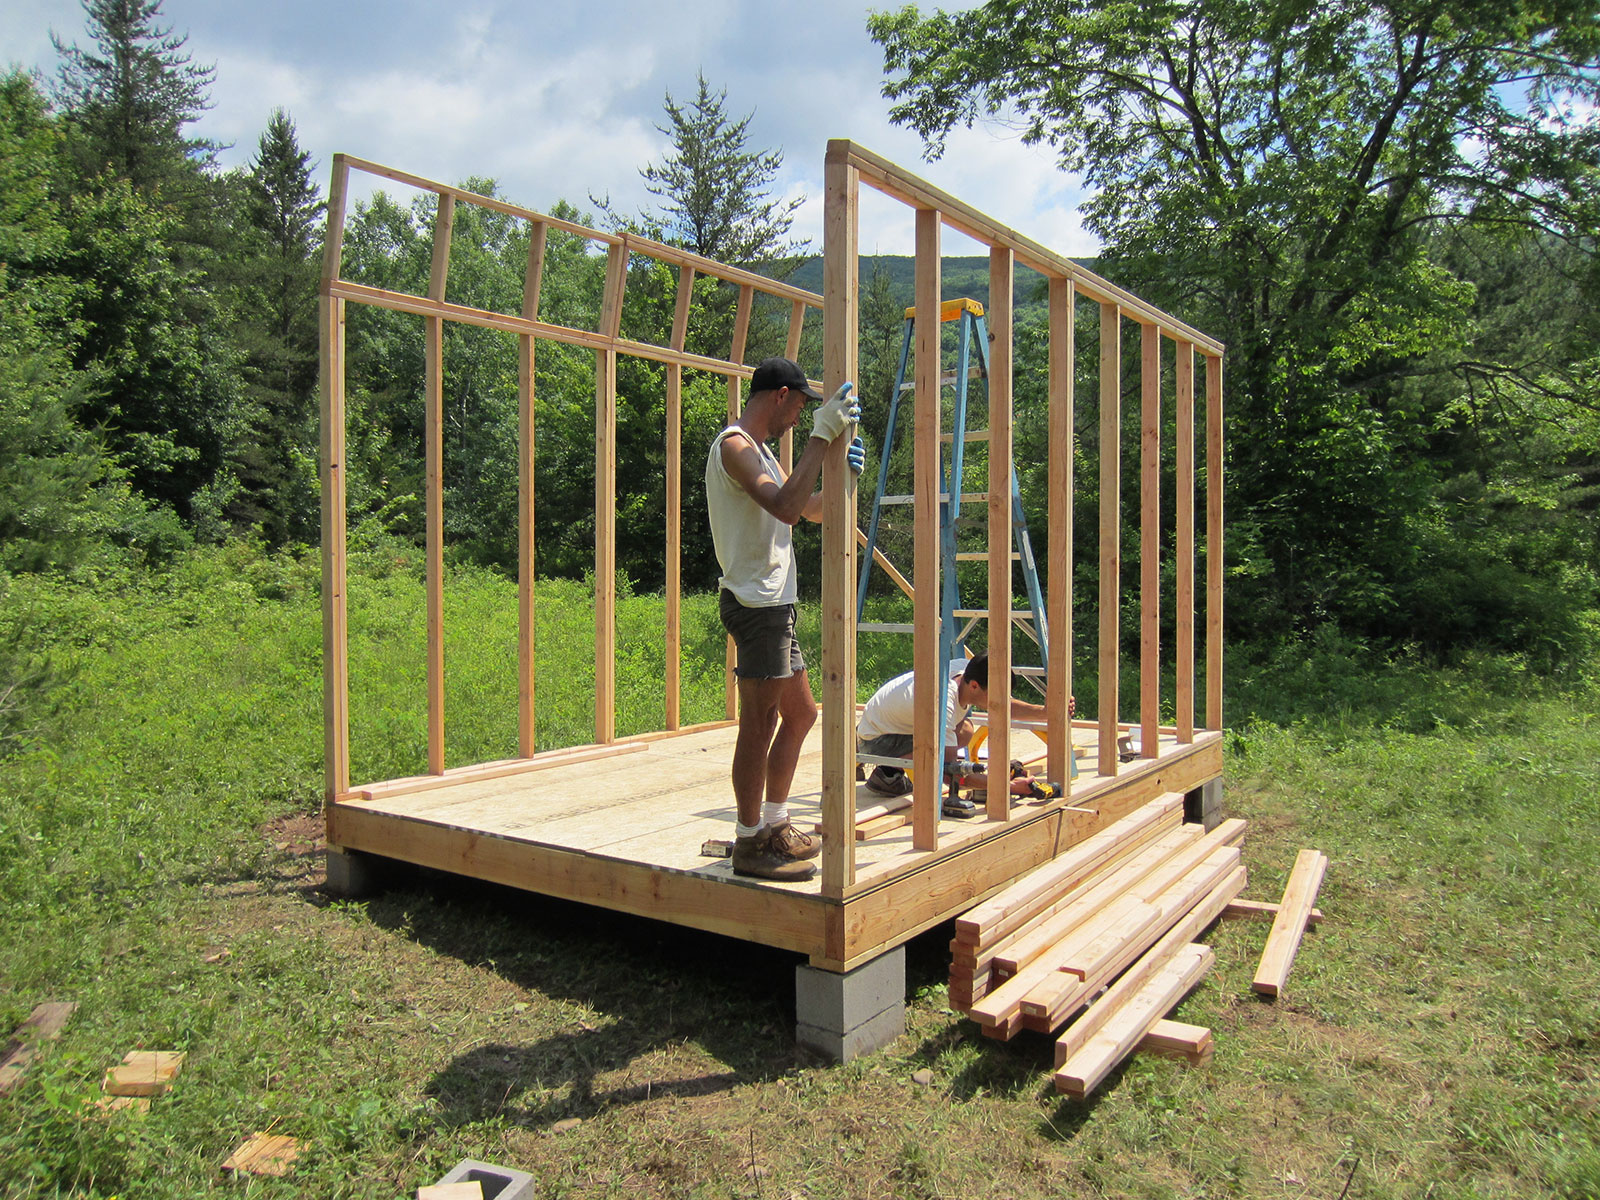
Step 4: Framing the Door Walls
- (2) 2 x 4 x 93 3/32"
- (2) 113" [ANGLE CUT]
- (8) 2 x 4 x 92 9/32"
- (2) 2 x 4 x ?" (DEPENDS ON YOUR DOOR SIZE)
- (2) 2 x 4 x ?" (GOES OVER THE DOOR, ALSO DEPENDS ON SIZE)
Next, you will measure the cut and angle you will need for the top brace of the remaining two wall frames. The frame with the single door is described as the DOOR wall. The frame with the double doors is described as the BARN DOOR wall. You will see if you zoom into the diagram that the top of each frame has a wacky cut where it conjoins the front wall frame, and a bizarre angle where it abuts the rear wall frame.

We cheated by measuring the cut and angle onsite, then used hand tools to make the proper adjustments so as to not have to return to the shop. Because both are precise but difficult to describe, we suggest you do this as well.
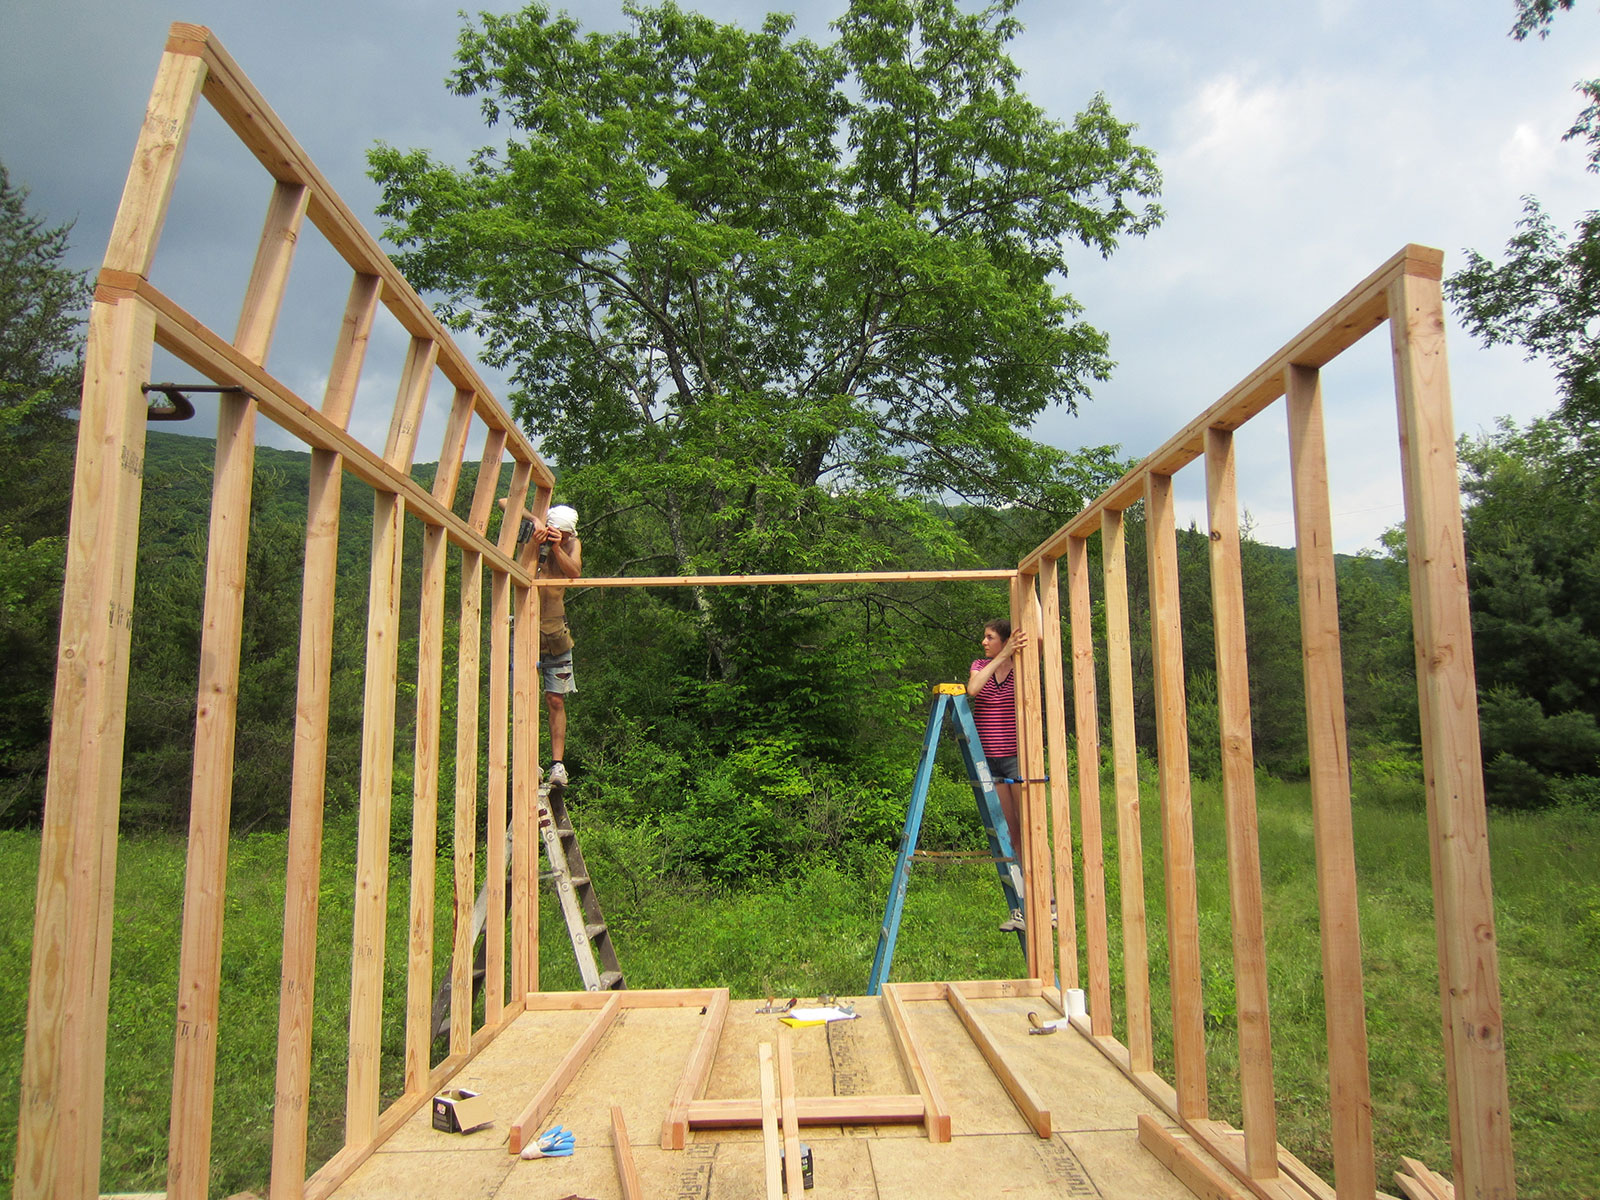
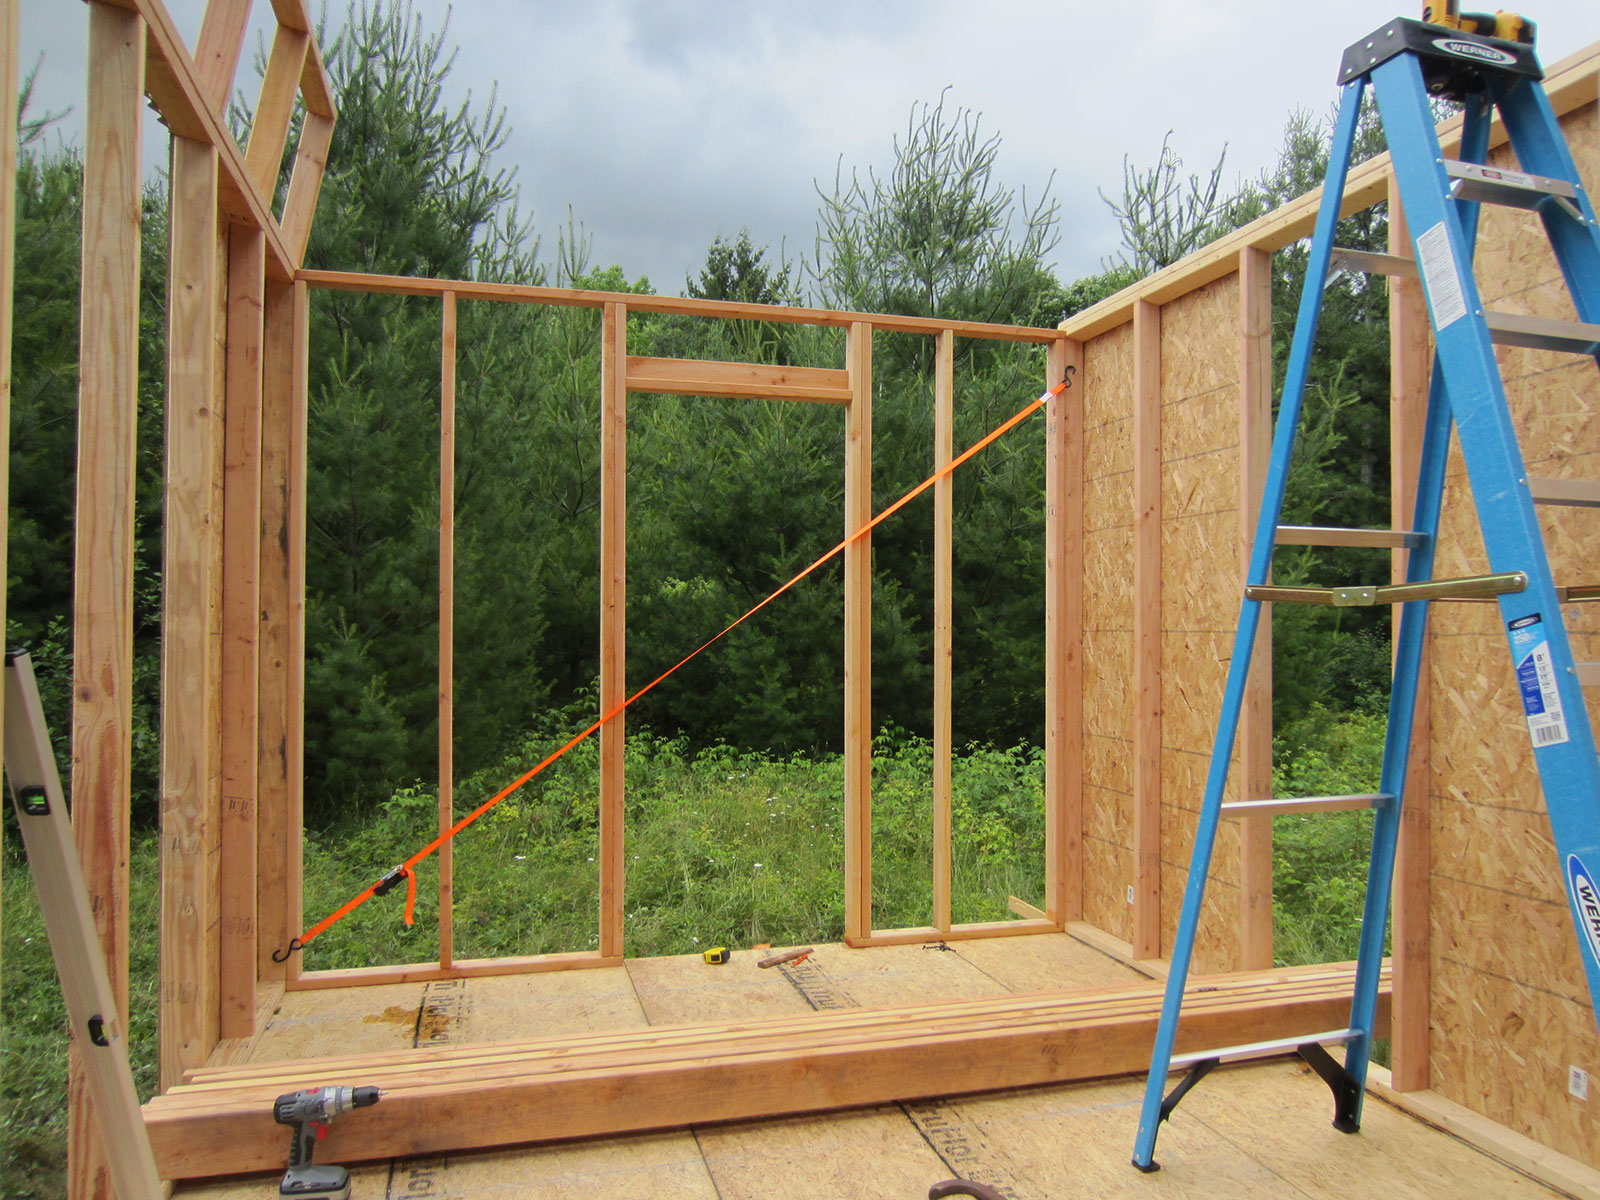
As you build the door wall frame, remember that the measurements between the studs will be contingent on the size of your door (as will the space between the top brace of the door wall frame and board sitting at the top of where the door will be). We bought pre-hung 32" doors, which differed from the diagram and necessitated adjustments. Complete the frame, erect it, check for square, and screw it into the floor and front and rear wall frames. The barn door wall frame is built and erected in the same manner.
Step 5: Constructing the Walls
- At least 7 sheets 7/16", 8' x 4' OSB, cut to fit your window design
- "Palruf Plastic Horizontal Closure" to fit your window design, if using corrugated PVC like we did
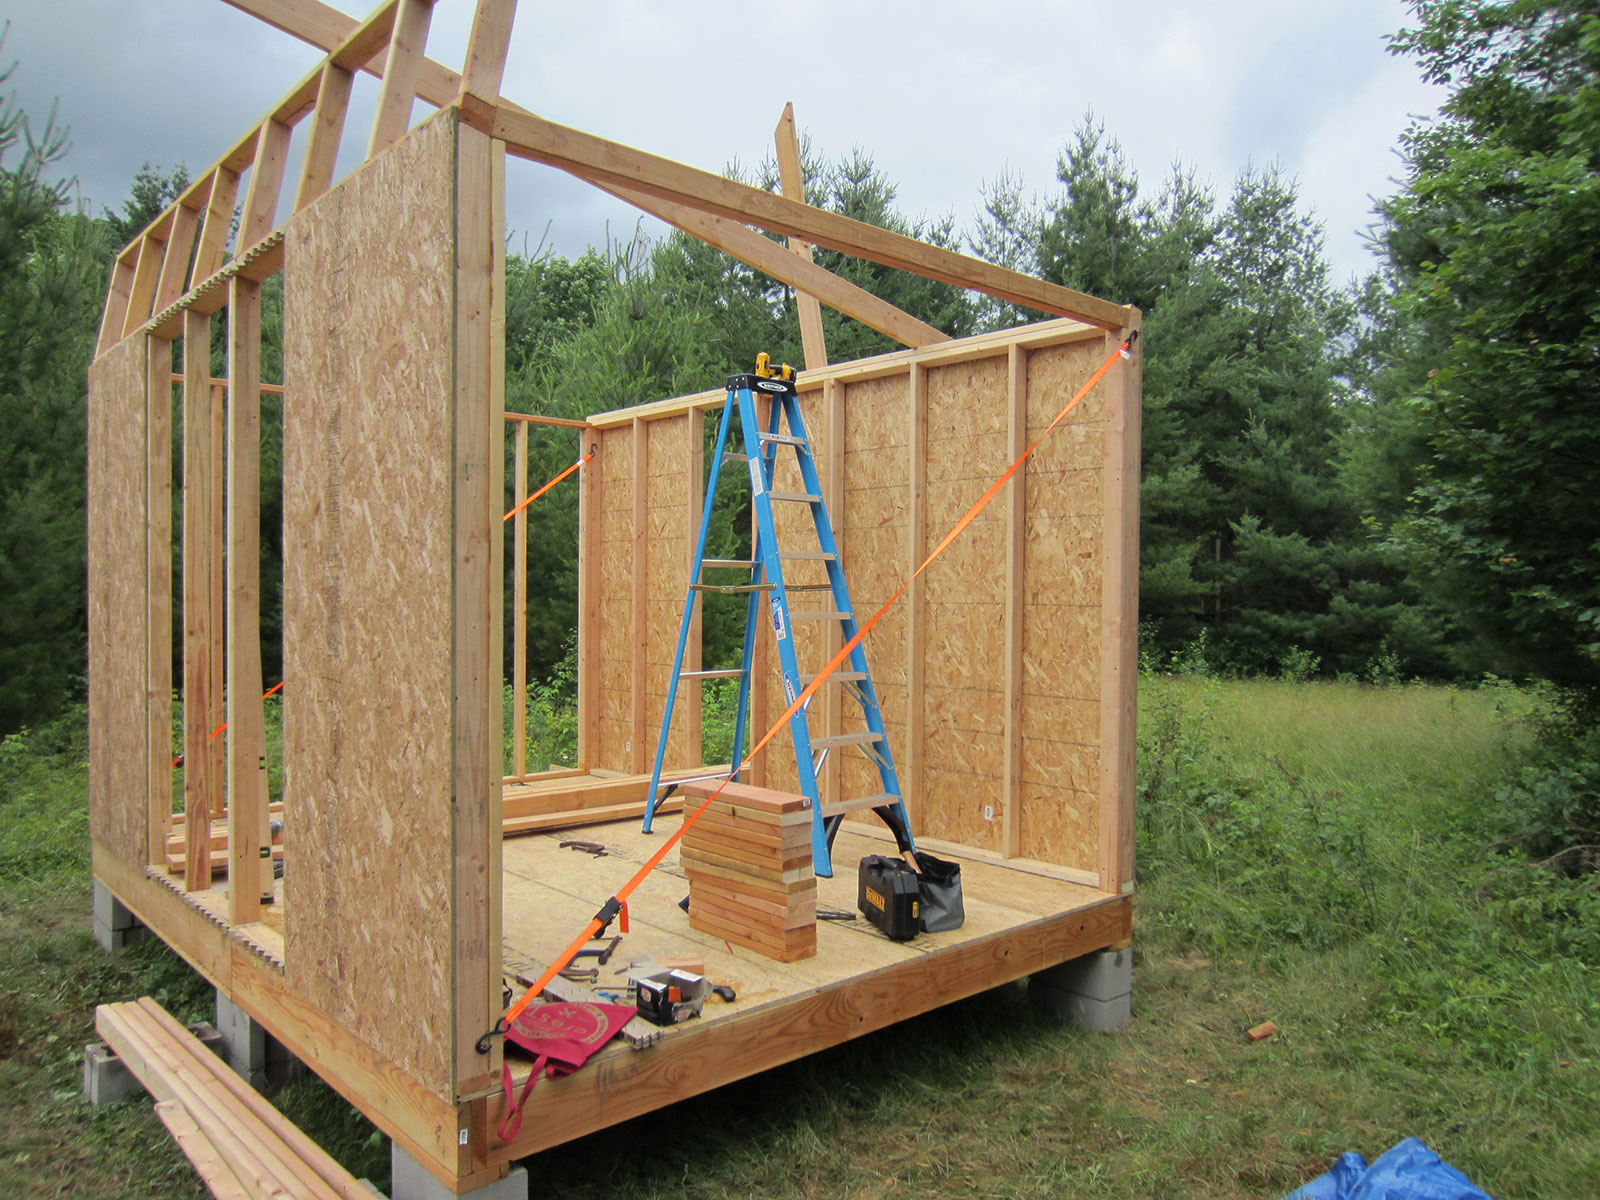
You can see above that the walls were being put in place as we finished the frames on one of the studios. Screw the OSB to the studs, leaving room for wherever you would like the windows. We did two different designs on two different studios. You can see one example in the below diagram and another in the photograph. Remember that you can use the walls to force the frame into perfect square if it is slightly misaligned. In the diagram, there are no walls without windows, which for sculptors is a great idea and for painters a poor one. Think about this this as you plan your windows! Lastly, remember to cut down a piece of scrap OSB to fit above your door.
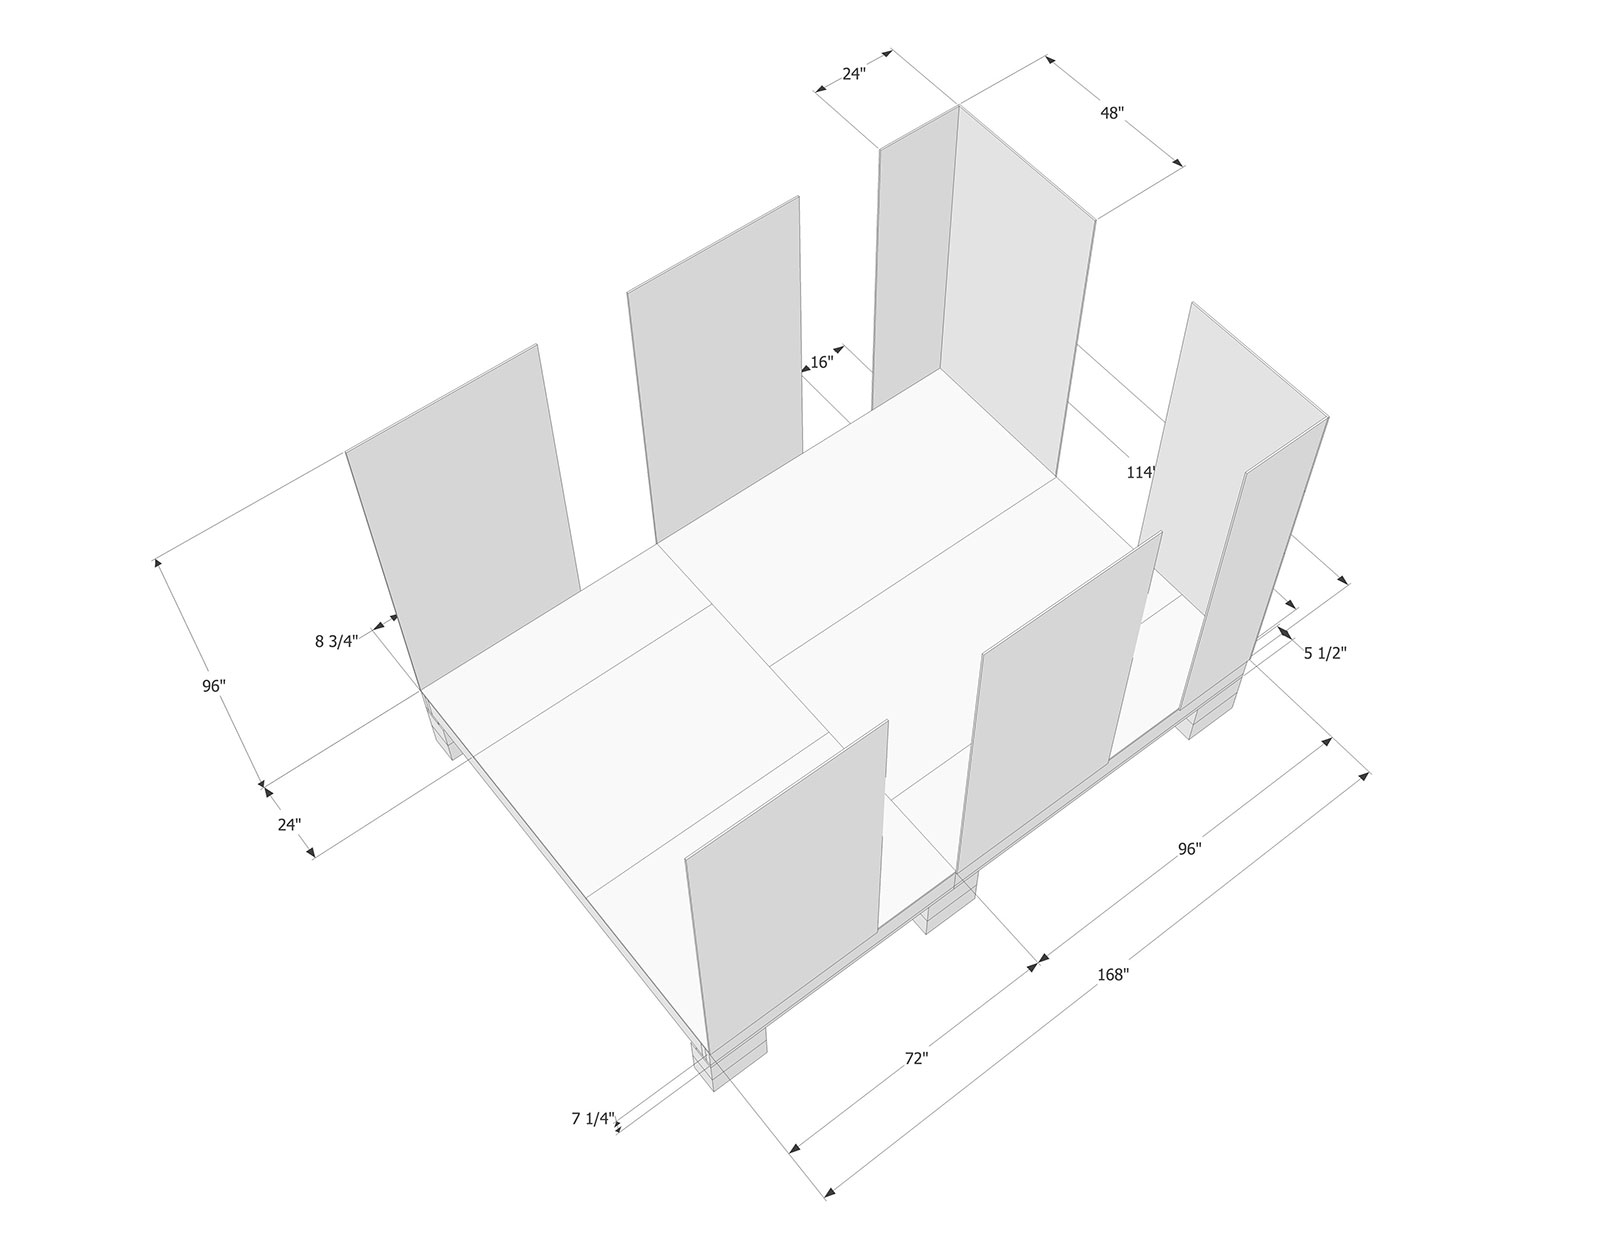
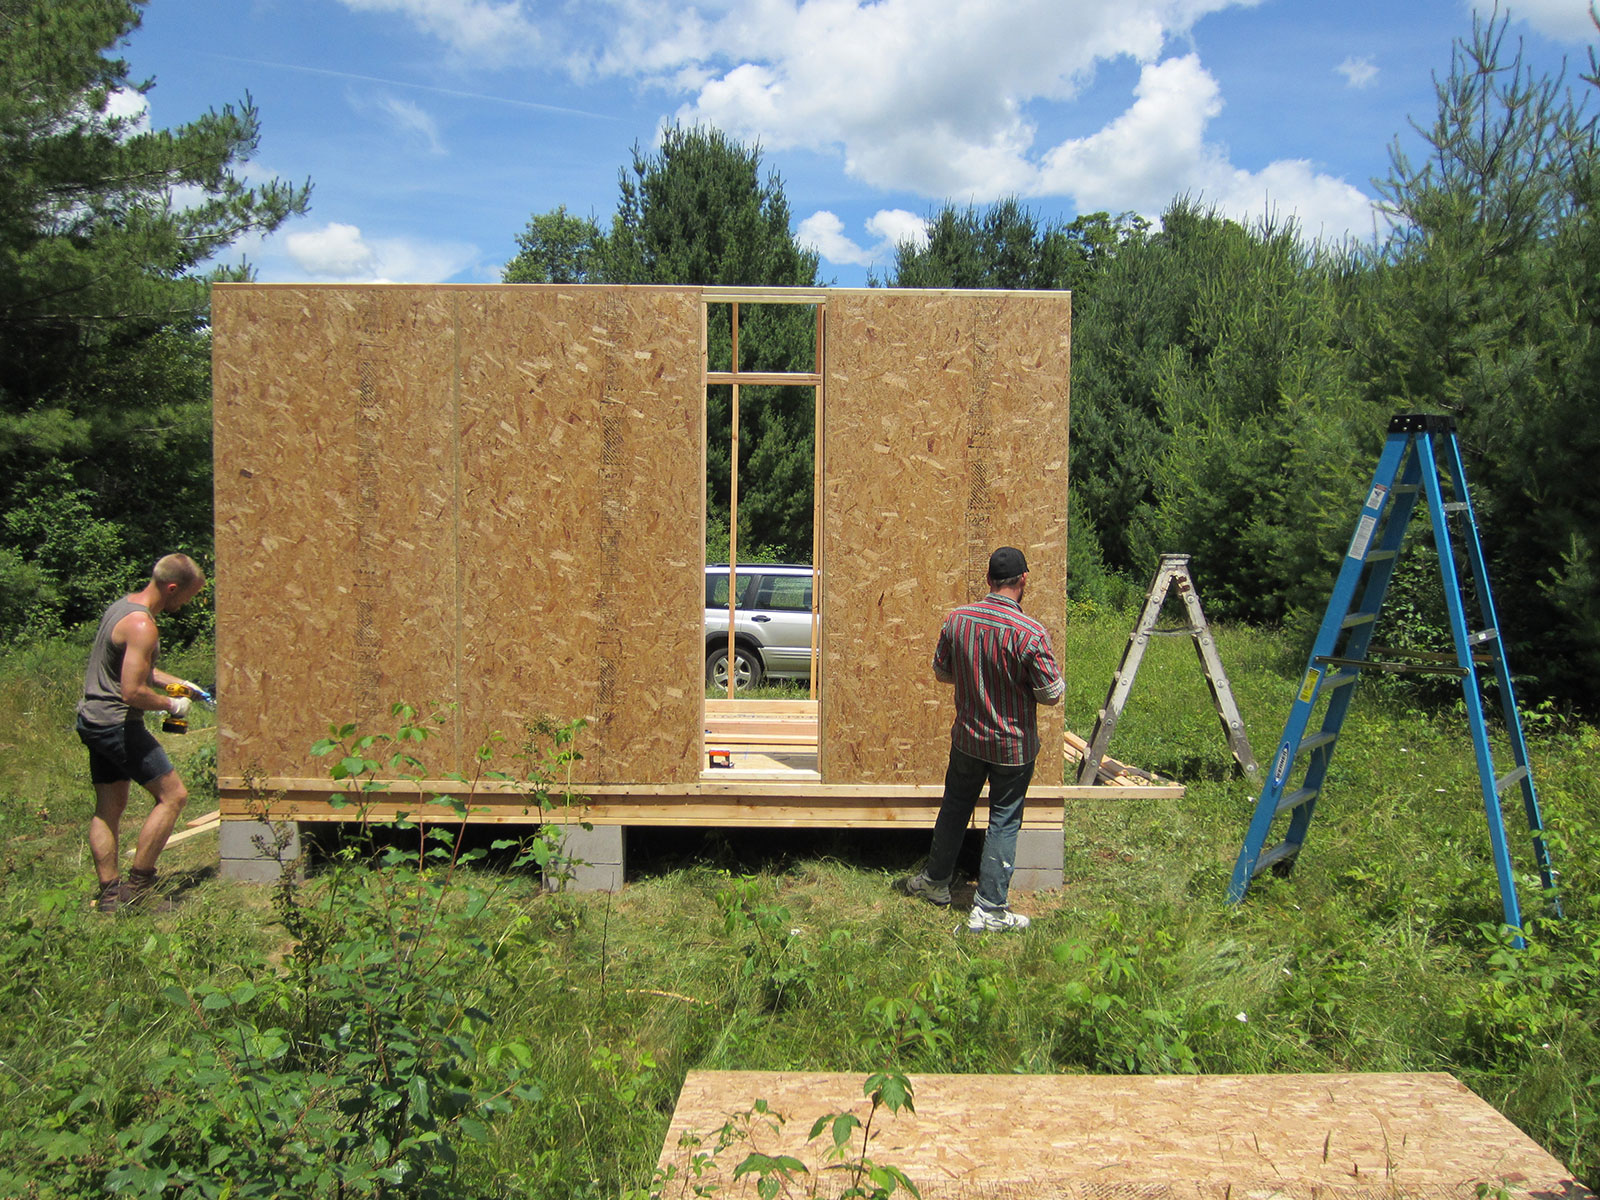
We used clear, corrugated PVC for the windows. It is inexpensive and relatively weather-resistant. You can buy pieces of rippled plastic that fit underneath the PVC and ensure that it sits properly.
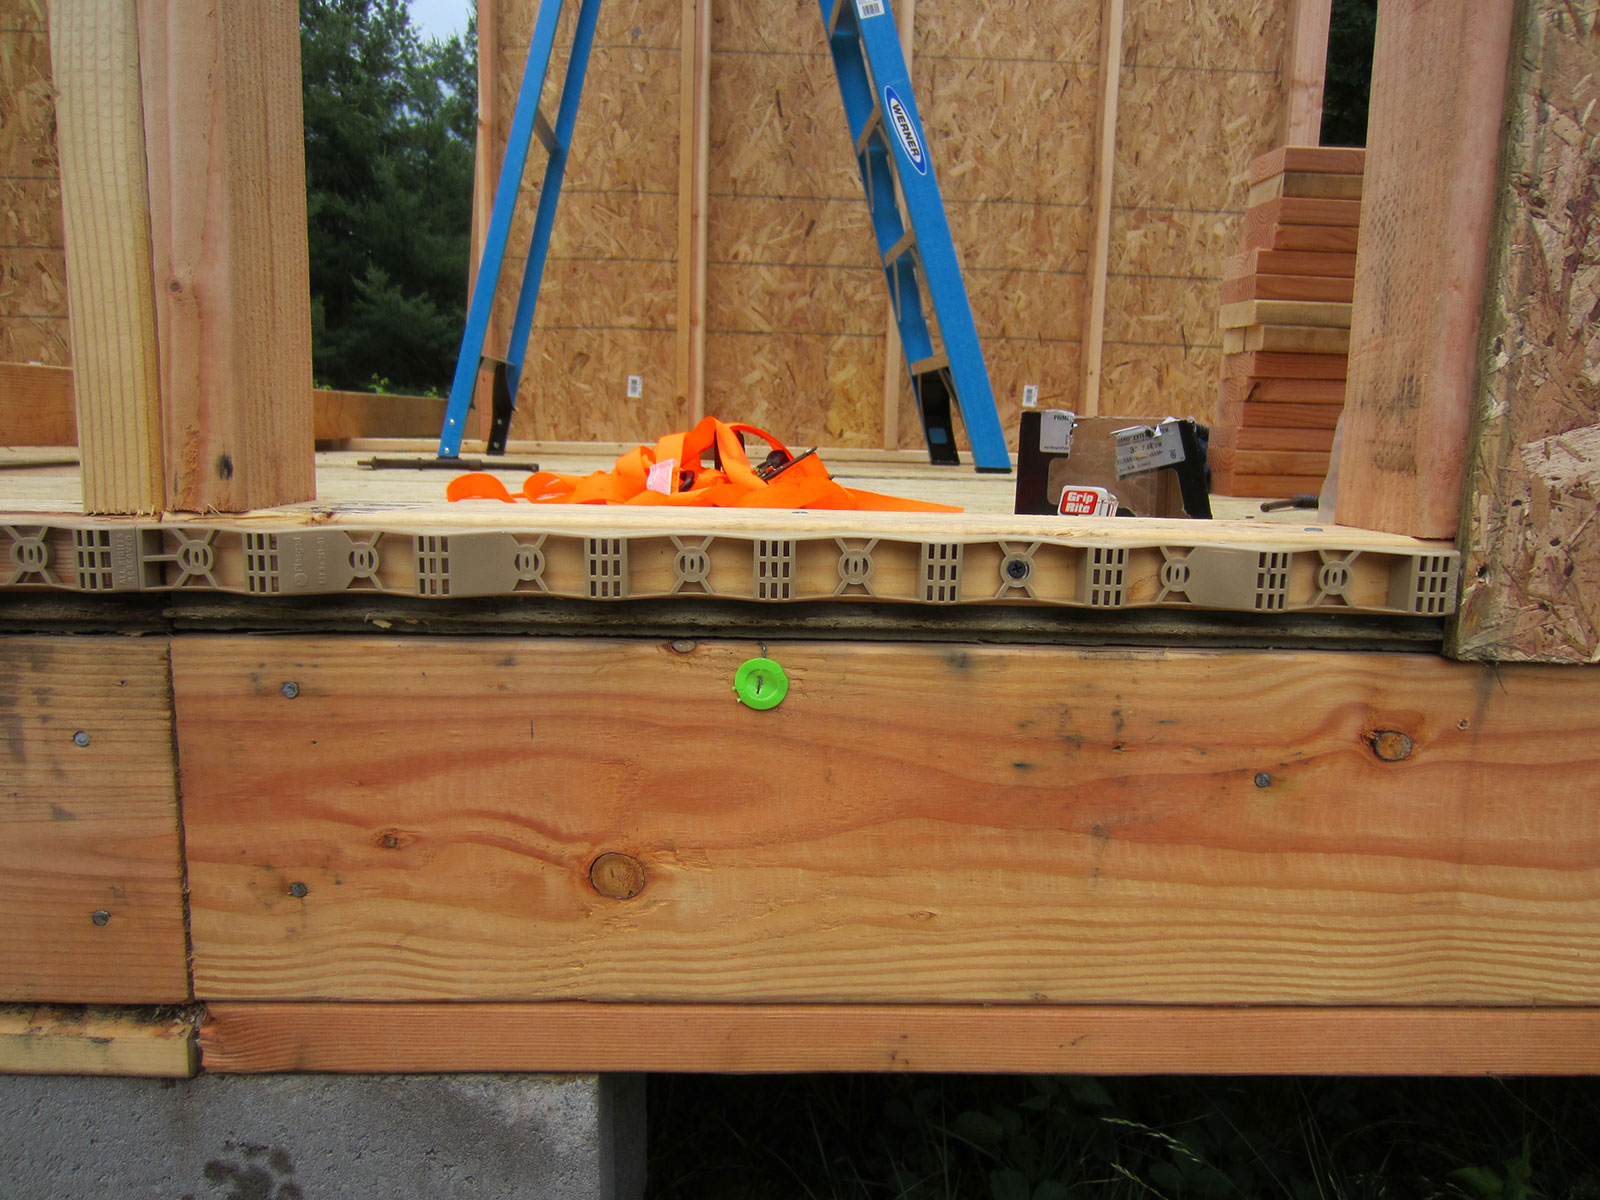
Step 6: Framing and Attaching the Roof
- (8) 2 x 6 x 168" [ANGLE CUT]
- (14) 2 x 6 x 11"
- (11) 1 x 3 x ?" furring strips (MATCH YOUR ROOFING)
- (12) 1 x 3 x 15.75" furring strips
- (8) 1 x 3 x ?" support braces [ANGLE CUT] (PICK YOUR DESIRED ANGLE TO FIND THE LENGTH)
- 10 sheets 3' x 8' aluminum roofing
- Roofing screws per above
- 28' inside closure foam
- 20' weather stripping
- Staple gun and staples
- 1/4" nut driver to sink the hex-washer-head screws
First, gather your rafters and lay them out as they will sit on the wall frames. We fit our rafters to the inexpensive roofing we found, then cut an attractive angle at one end.
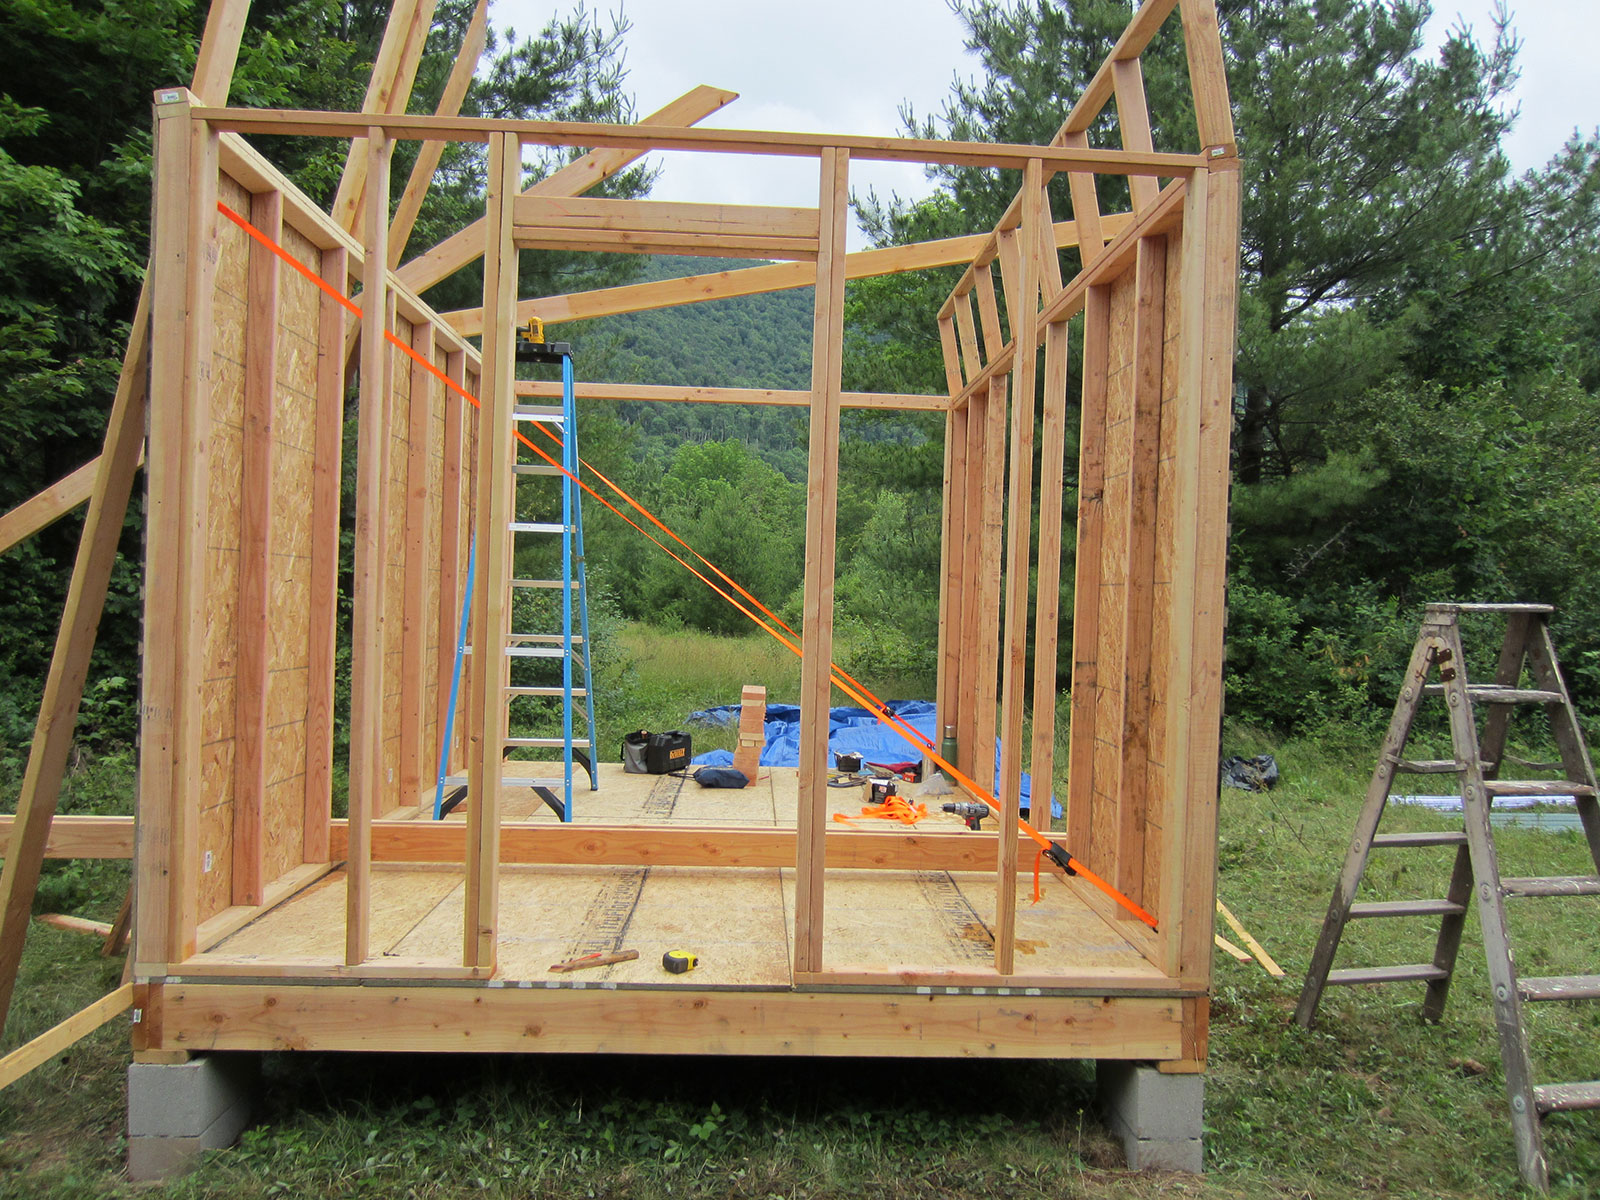
Lay out blocking between the rafters as for the floor frame, with opposite sides of each piece of blocking meeting on-center end to end between the rafters. The blocking will sit on top of the front and rear wall frames. Screw everything down and together.
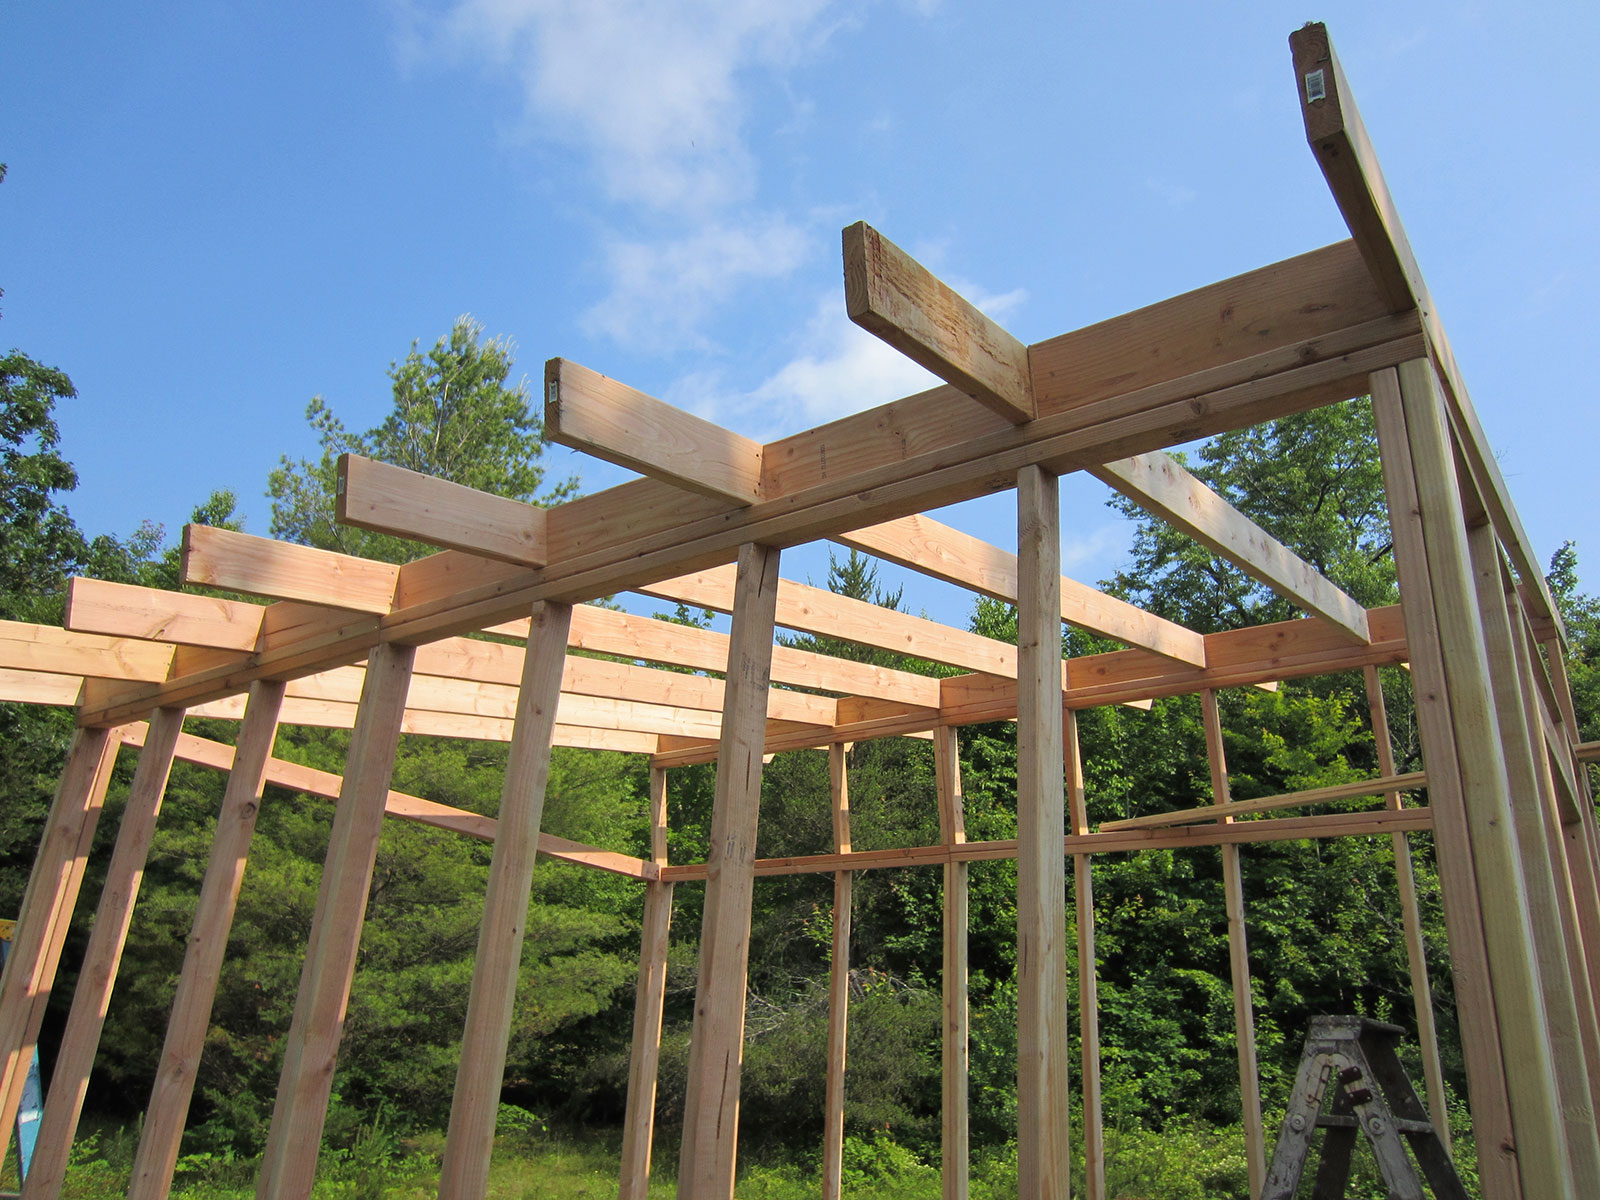
We used 1 x 3 furring strips for our purlins, which are situated across the rafters so you have something to screw the roof into. For their length, see below. In the photographs, you can also see the inside closure foam we used underneath the roofing on the front and rear walls. You must staple it to the purlins above the front and rear walls with a staple gun. The ribs sit underneath corresponding ribs in the roofing. Additionally, you must attach the 15.75-inch-long furring strips lengthwise to the rafters over the barn door and door walls. This will ensure an even surface for the roofing to lie against. We covered these with plain, self-adhesive weather stripping before attaching the roof.
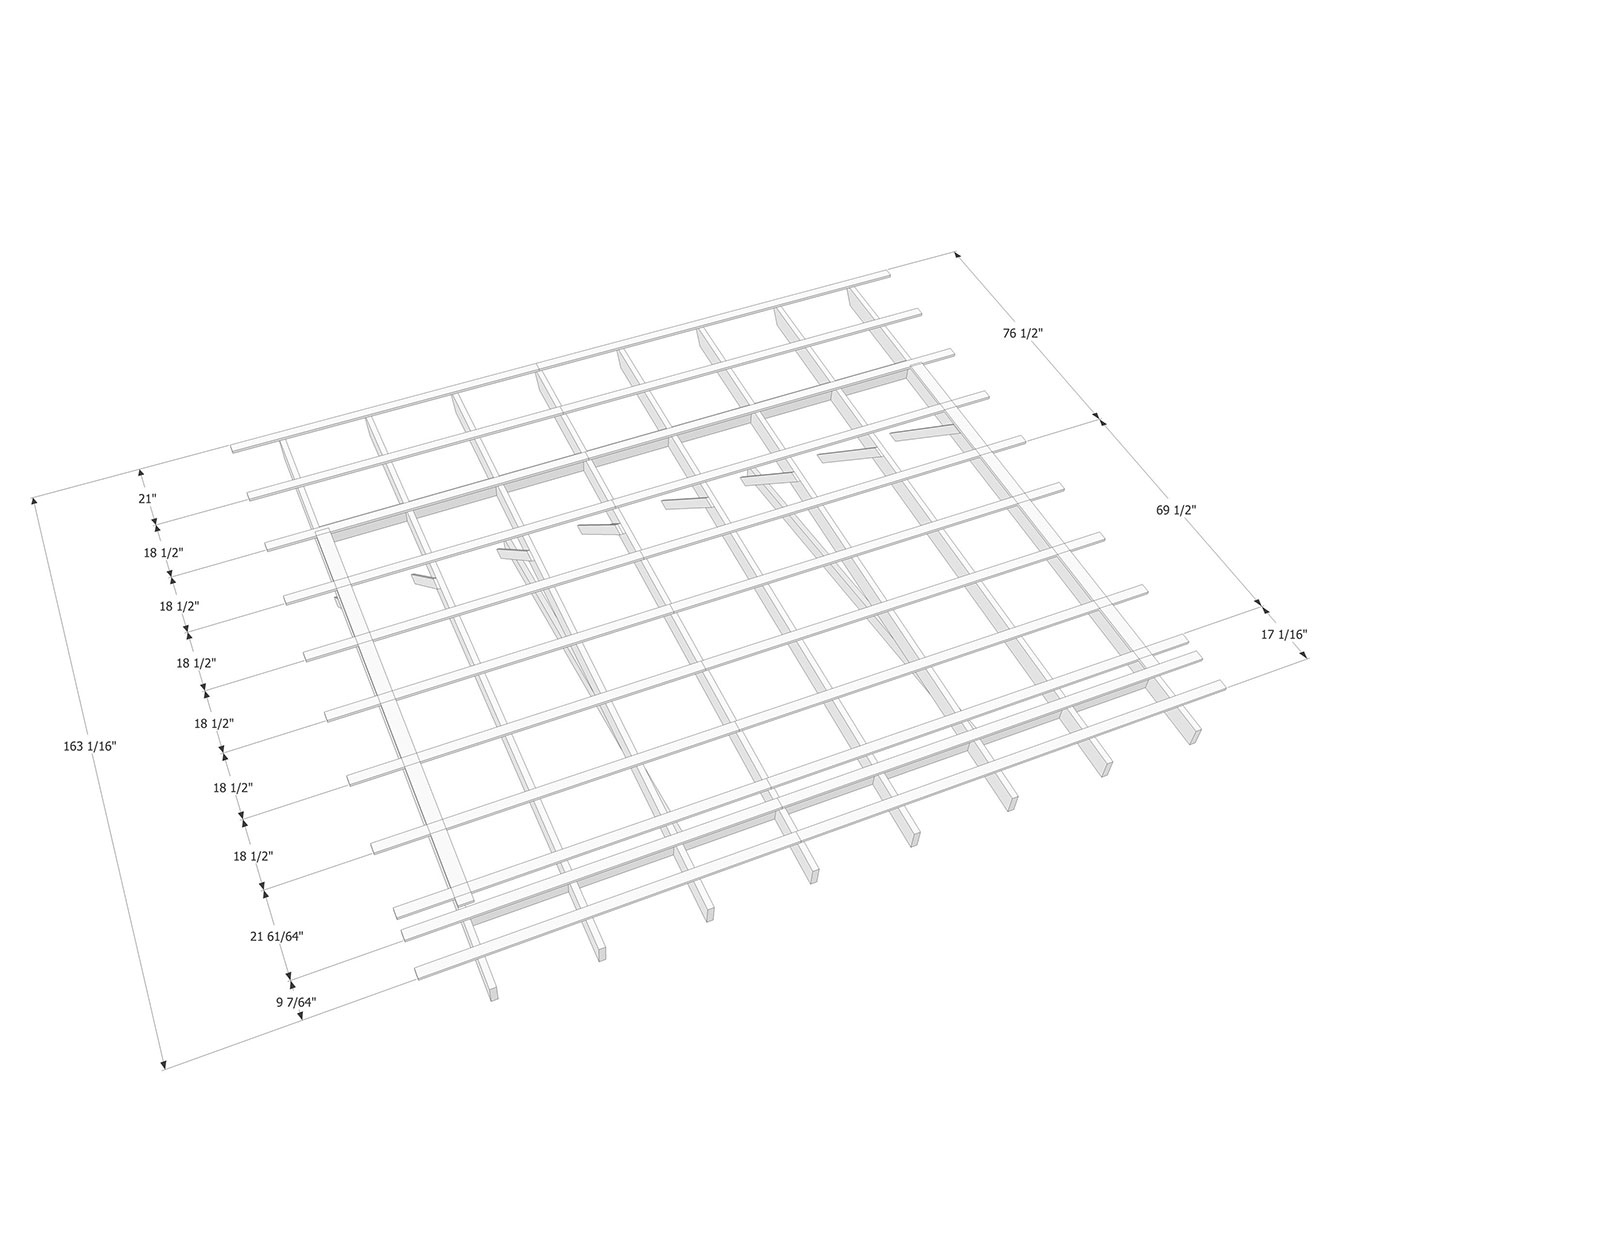
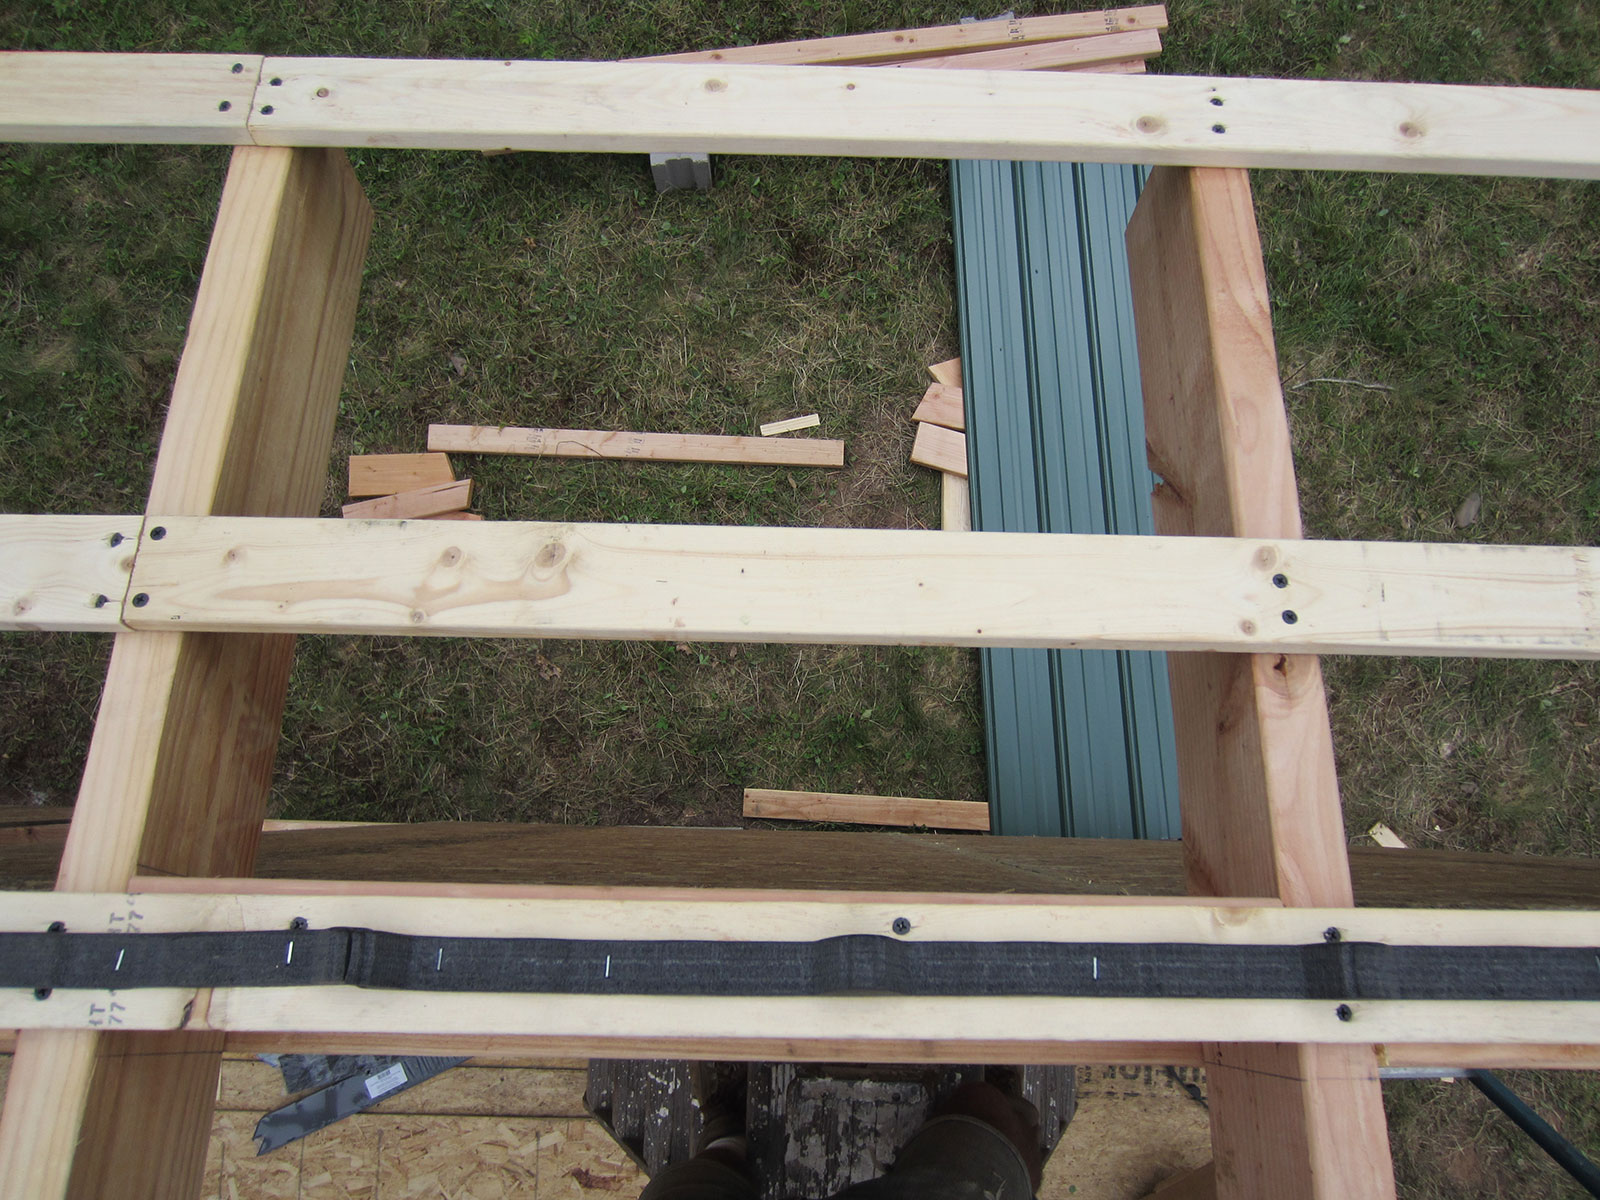

Next, you will attach the roof. We found corrugated aluminum roofing panels that were relatively inexpensive, at 3' x 8'. They overlapped 24" top to bottom, to fit our 10' long studios, with enough overhang to shield the windows from weather. Side to side they were designed to fit one on top of each other with about a 1/2" overlap, so our furring strips were 178" long (made from two or three pieces end to end, as you can see one of the photographs above). It took 10 roofing panels in all.

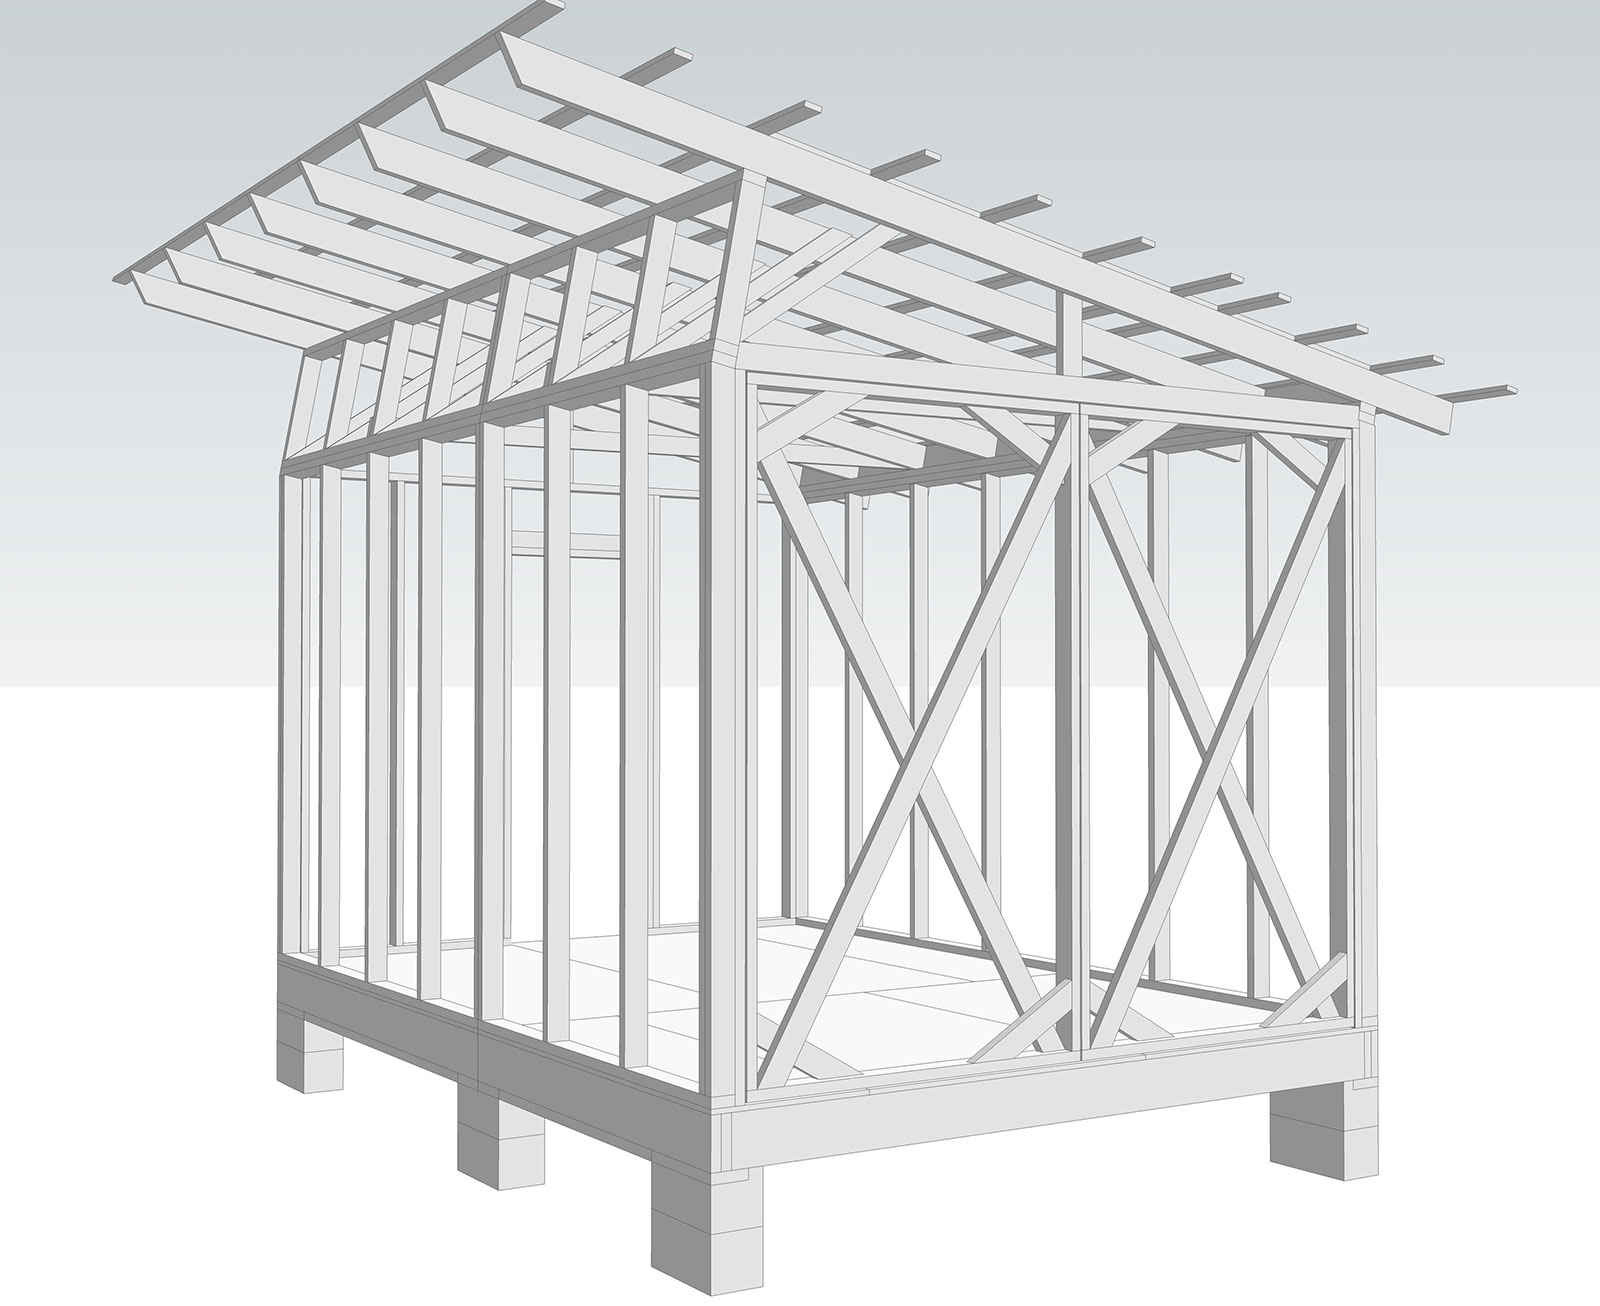
Lastly, you will attach diagonally vertical braces from the upper wall frame to the rafters. You can see one peeking out above the door in the photograph below. You can pick your own measurements for these, as they are very visible and the angle doesn't matter overmuch so long as it provides enough support. In the diagram there is also a horizontal support running between the rear and front wall frames. We chose to not include this in the final studios, and they haven't caved in so far.

Step 7: Installing the Doors
- (1) Pre-hung door, or build your own
- (4) 2 x 4 x 54"
- (4) 2 x 4 x 92 3/4"
- (4) 2 x 4 x ?" (PICK A DESIGN YOU LIKE FOR THE BARN DOOR SUPPORTS!)
- Shims
- (4) Sturdy hinges at least 3"
- (2) Window bolts, hasps, etc, to attach to the bottom of the barn doors so they can be locked shut
By now your studio should look something like the below, albeit with walls and a roof.
The last pieces of the puzzle will be the doors. As I mentioned, we used pre-hung for the single door. You can see what one looks like in the photograph below (that is an entirely different studio design in the picture, however).
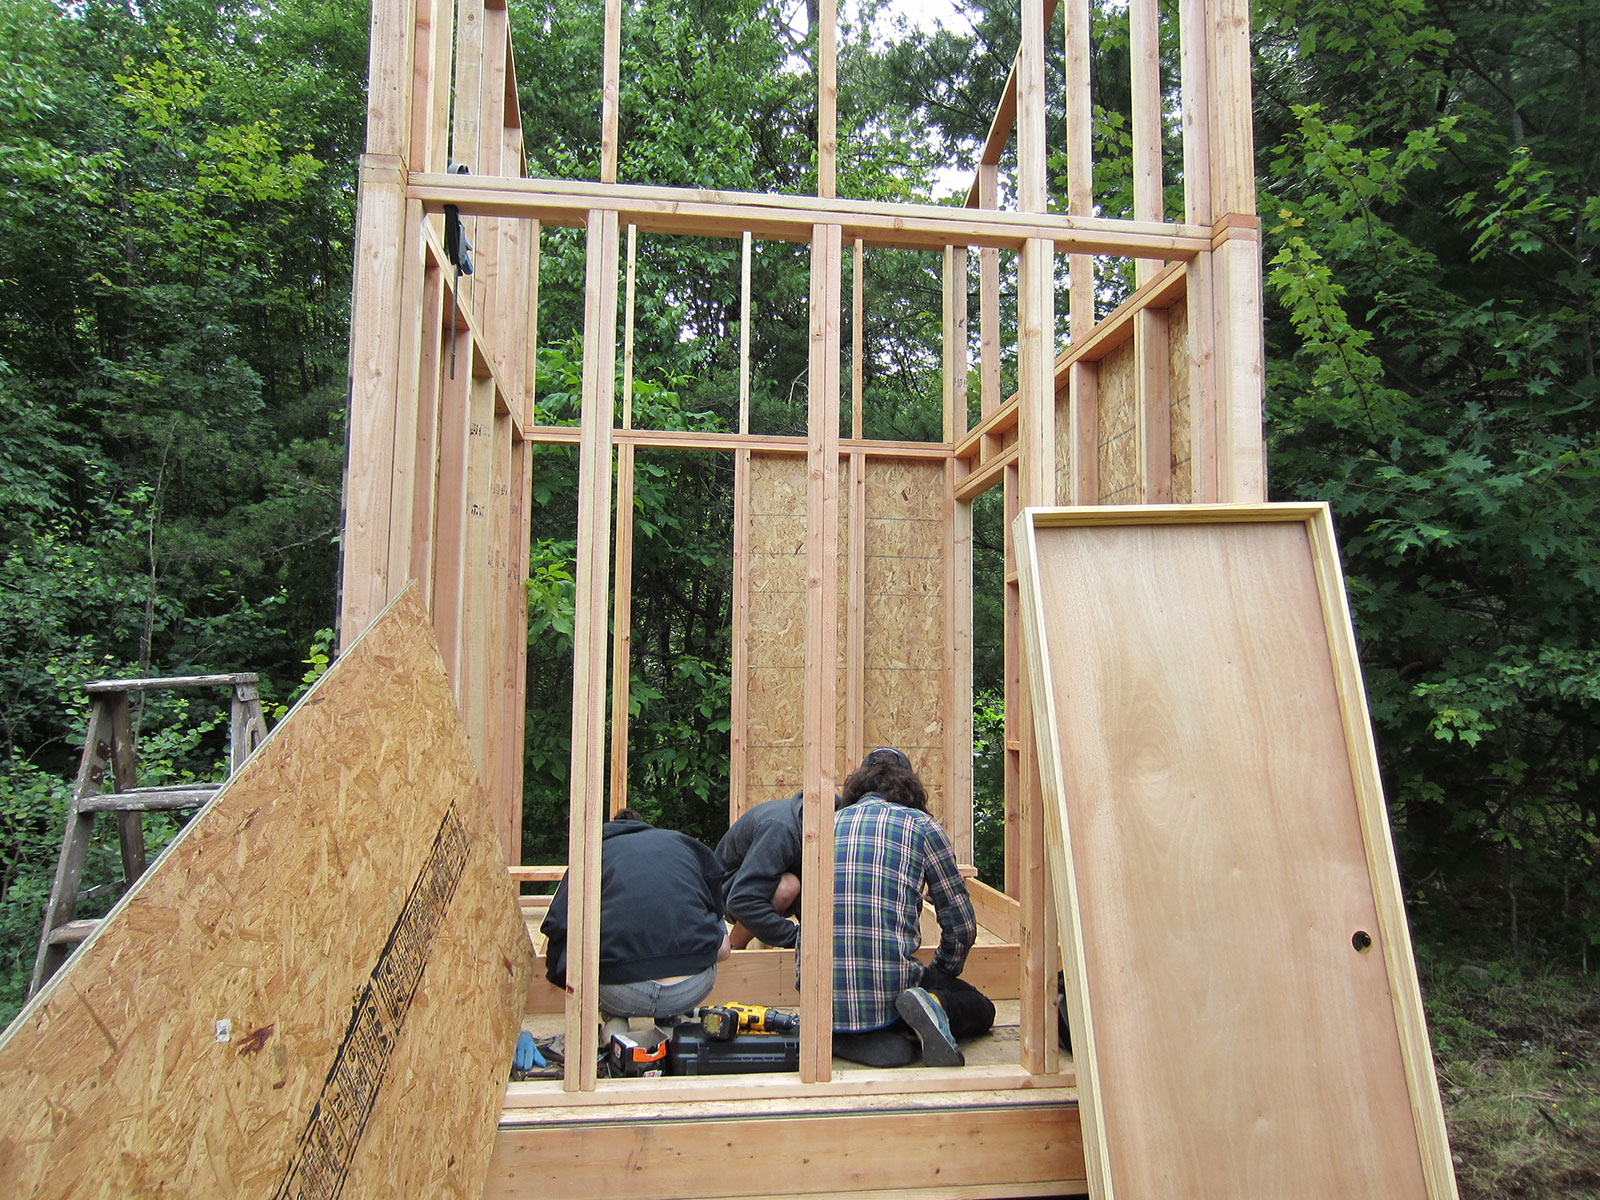
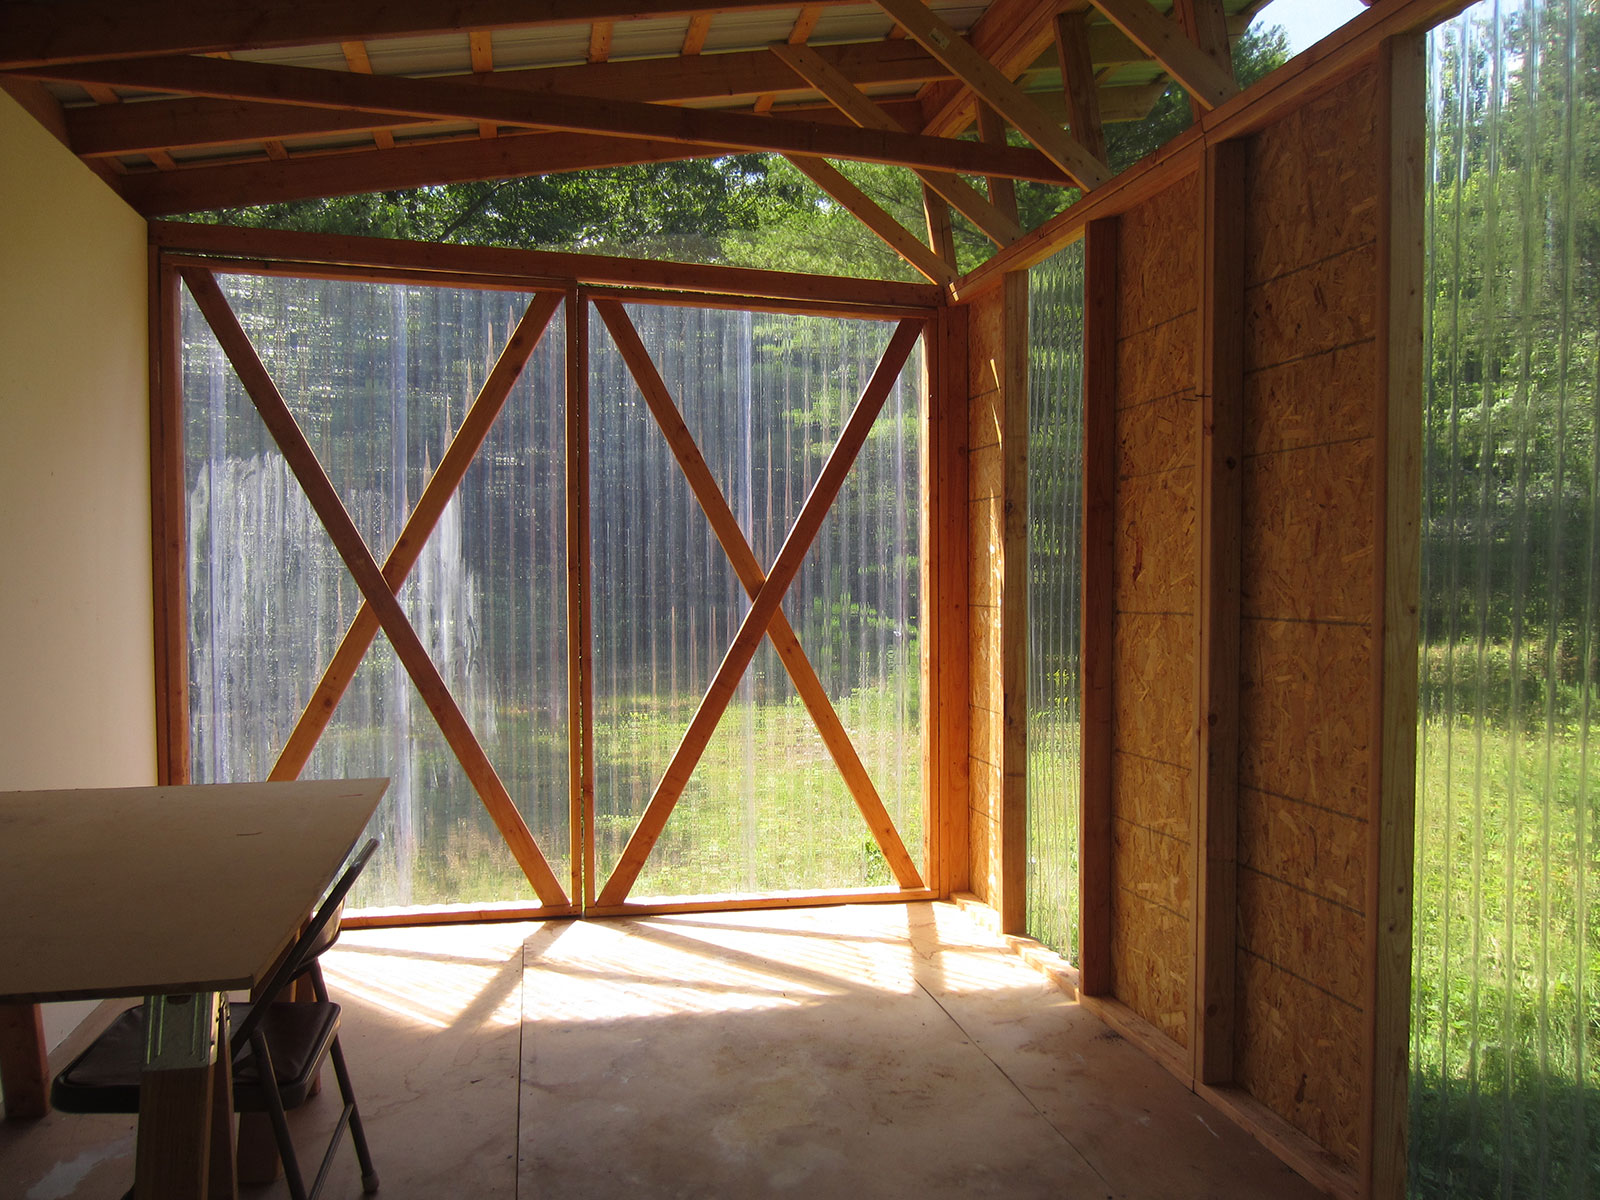
You just have to screw it into the opening you left in the frame. Remember, too, that you can shim away any slight imperfections for this pre-hung door, but that the barn door you are about to install will require perfect square to fit properly. As you progress though the steps above, continually check for square. If you very carefully ensured that your foundation was perfectly level, this will be a slight headache at regular intervals instead of a cancerous problem that metastasizes out of control by the end. We made our barn doors 54" x 92 3/4", with plain diagonal braces.
But you should get creative with your design because if you use clear PVC like we did for one of our studios, it will be very visible even from the outside. Once they are complete, the wind can really take the giant barn doors. We reinforced ours with heavy-duty hinges, and when they are open, we anchor them with cord tied down to cinderblocks.
Step 8: Finishing touches
- 5 gallon bucket of exterior paint
- PVC or similar material to fit your window design, and barn doors per the above
- At least 24 feet of window screen, 24 or more inches tall
All that's left is to finish up your windows, install your door knob, and paint. As mentioned, we used PVC for the wall windows and barn doors. We used the same screws as for the roof to attach the PVC. We stapled window screen to the upper wall frame and other open areas underneath the roof (one length of 12' screen can be cut to fit above both the door and barn door walls if the screen is 36" tall: a standard height). Make sure you use a high grade exterior paint on the studio, as it will be all that's keeping the building from literally melting in the rain.
SOME NOTES ON THE DESIGN
1: We have found that these upper windows are not as weather-proof as they should be for a building meant to store artwork. You might consider a heavy curtain or using a different material than window screen to finish them. That said, they do let in a lot of light and help with air circulation when the doors are closed, as is.
2: If necessary, this design can be realized with a crew of only two reasonably fit people. More help obviously makes it go faster, but there are no steps that require more than two sets of hands. After the cuts were made and the foundation dug and set, it took about two days to build each studio. We built them without electricity on-site, having made all the cuts at a shop we cobbled together at a house nearby.
3: Be very careful as you're screwing down the roof: if you miss a purlin, there will be a leak from the screw hole! 4: We did not plan to install drywall, even on the wall with no windows. This turned out to be a mistake, and we encourage anyone who will want drywall to plan for it as they go. The blueprints as they are will make it impossible to install the sheets properly (i.e., there will be one or more sheet edges that cannot be screwed down).


Enjoy your studio!
By downloading this guide, you acknowledge that Shandaken Projects and its employees and officers (the Released Parties) take no responsibility for its contents, accuracy, or the soundness of the design provided. You further assume all risk and liability for losses, damages, expenses, personal injury, and death while following its instructions, or while in or around the building that it diagrams. By using this guide, you agree to release and forever discharge the The Released Parties for all services, expenses, compensation, or damages sought in connection to any of the above. This guide is free and publicly available for individuals. We ask that organizations who wish to use this guide please contact us to discuss it further. If you use this guide to build yourself a studio, please endeavor to credit Shandaken Projects where possible. No part of this guide may be reproduced without permission.